

Cal
-
Content Count
1,034 -
Joined
-
Last visited
-
Days Won
16
Posts posted by Cal
-
-
Is it freshly painted? Did you clean the wall first? If you did, with what? If you are sqeegeeing it, did you apply it wet? Depending upon the size of the decal you might lay the sqegee down and just use your thumb or a tennis ball. A sqegee is good on glass but not many walls are as smooth as glass.
Cal
-
 2
2
-
-
Good luck, hope you have a great 2018 to start off!
Cal
-
1
-
-
12 hours ago, ExposeURDesigns said:That was it thanks man I really just cut my time in half
Wow!
You might look into A. upping your cut speed B. reducing the number of nodes in your designs and C. make sure you are not cutting any part of the design a second (or third) time.
As an example, a circle or oval shape can be cut with 4 nodes. Any more than that creates extra "work" for the cutter.
And welcome aboard, glad to have you here,
Oh, one last thing, Ms Skeeter is a lady
 and a real helpful one at that!
Cal
-
2
-
-
I've not resolved anything yet, but then I have a couple days to think about it...
I guess I could think about not being such a procrastinator for starters!
-
 1
1
-
-
12 hours ago, Primal Decals said:Dolomite41 I can give you help over the phone if you wish, Send me a Pm And ill give you my number.. Im pretty positive i can get you going with just one call and in about 15 min.
And right there you go @Dolomite41. An offer you can't (and shouldn't) refuse. Primal is a good guy with a heap more experience than myself.
But, since you asked... it does not matter where you load the vinyl as long as you have the pressure rollers over the feeders (not even sure what those things are called).
A 50' long design!!! The only thing I have done even close was a set of pin stripes for my truck. Those were maybe 18'. I used Sign Cut step by step cutting on my SC cutter. Results were not saleable, but ok for my use.
As an experiment I loaded a design into AI and saved as an SVG (I usually save as an AI or EPS). I then imported into SCALP and it loaded immediately. It was a smaller design, but complicated. Not sure what you are running into unless it is those 50' long designs?
I very much recommend that you give Primal a shot..
Cal
-
1
-
-
Cool Mr. Joel - I have always use the "by guess & by gosh" method - and practice runs...
Cal
-
1
-
-
Welcome aboard Dolomite and congrats on the new cutter. What type of projects do you have planned for it?
I will try to answer your questions, others may do a better job of explanations though...
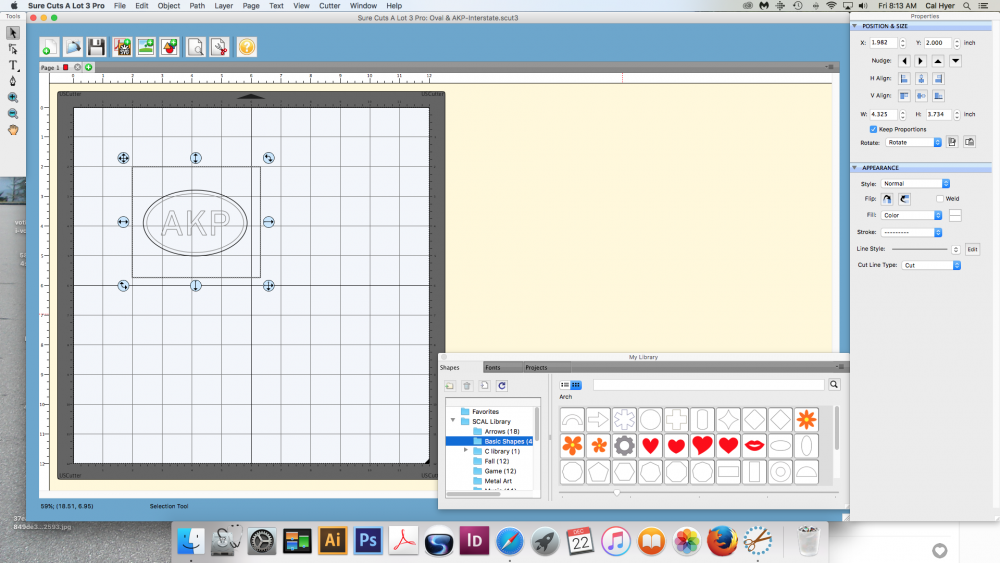
1. You size the project to the vinyl (or paper). If you look at my pic, the project has the blue circles with various arrows, this shows the outside of the selected artwork. Look at the tool bar on the upper right labled "Properties". Under "Position & Size" you find the "X" & "Y" axis which shows where the object is placed on the workspace grid. Below that are boxes labeled "W" & "H" for width and height of the project. Using my project as an example, the outside measurements are 4.325" wide by 3.734" tall. If either of those measurements are larger than your paper you are in trouble. You can resize your project by using the little up & down arrows or simply deleting the numbers in the box and typing the size you want. The "keep proportions" box under the size will sync the measurements so changing one will change the other - or not. You do not want to cut off the paper, doing so will cut into the cutting strip which can cause future problems for you. I have never cut plain paper, but I think you use a cutting mat under it if you do.
2. I do not know of any way to speed this process up, and really not sure what you are referring to. When I finish a design in AI and hit save, I can immediately import it into SCALP and cut. Not any hold up in time...
3. If AI asks about a dpi I just use default. I have never seen it ask though so I am not sure of the question. I will have to look the next time I am in AI working.
4. My speed & pressure is 200/55 - that is on an older SC model.
Cal
-
Welcome aboard Tanya,
Cal
-
 1
1
-
-
Welcome aboard,
Cal
-
1
-
-
Welcome aboard Church504. A couple of questions I might ask, what is your experience level? I am guessing that you are fairly new to vinyl, not just this site.
In addition to the tips listed above, how are you pulling the transfer tape off? You do not want to pull "up" on the tape, it will lift the decal. You want to "peel" the tape off. And maybe because I am right handed, I find it an easier peel when I go left to right on the decal. I do not know why exactly. YMMV.
Also, how large is the decal? Inside or outside application?
I will apologize in advance if you have plenty of experience and find the above elementary...
Cal
-
3
-
-
Welcome aboard Silverag, go ahead and step up to the SC cutter. It is a great machine that works well with Macs.
Cal
-
Thanks, I will definitely get out of the southwest rut and search around the upper midwest.
Really appreciate it,
Cal
-
-
Now those are good observations jmas. I noticed the tree got moved between the first and second picture also!
Time to expand my search area I think...
Keep throwing darts Scott - some of us like those old A Bodies!
Cal
-
Wow, Merry Christmas indeed!
I will have to get a tree up if it works like that
Cal
-
1
-
-
Catskill's?
Can't say yea or nay as we don't know, but it does not look like any part of the Catskills that I have been through.
Cal
-
This is similar to a game I've played on another site. Over there we have to come up with the likely location the photographer was standing to take the advertising pic.
This pic has everyone stumped, including the threads "moderator". So, anyone here happen to have seen this church in your travels?
Best we can guess today is somewhere in the southwest US.
Cal

-
Welcome aboard AmberK, glad to have you here.
I have an older model SC and it has been a great machine. I have had no problems with it.
Cal
-
The above is good advise.
You did not tell us what pressure you were using, or how long you are letting the gun stay in one place.
I use 50-60# on glass, using Oracal 651- but I keep the gun moving.
Less detail is better IMO, or at least less small detail.
When I do glass work, I go over the design 4 times, but I am moving quickly. I move the gun from left to right.
Pass 1, holding the glass upright and turning the glass as needed.
Pass 2, holding the glass upside down and turning it as needed.
Pass 3, holding the glass horizontally by the bottom and rolling the glass around &
Pass 4, holding the glass horizontally by the top and rolling the glass around.
This is four quick passes to be sure that the design is done evenly, especially at the edges.
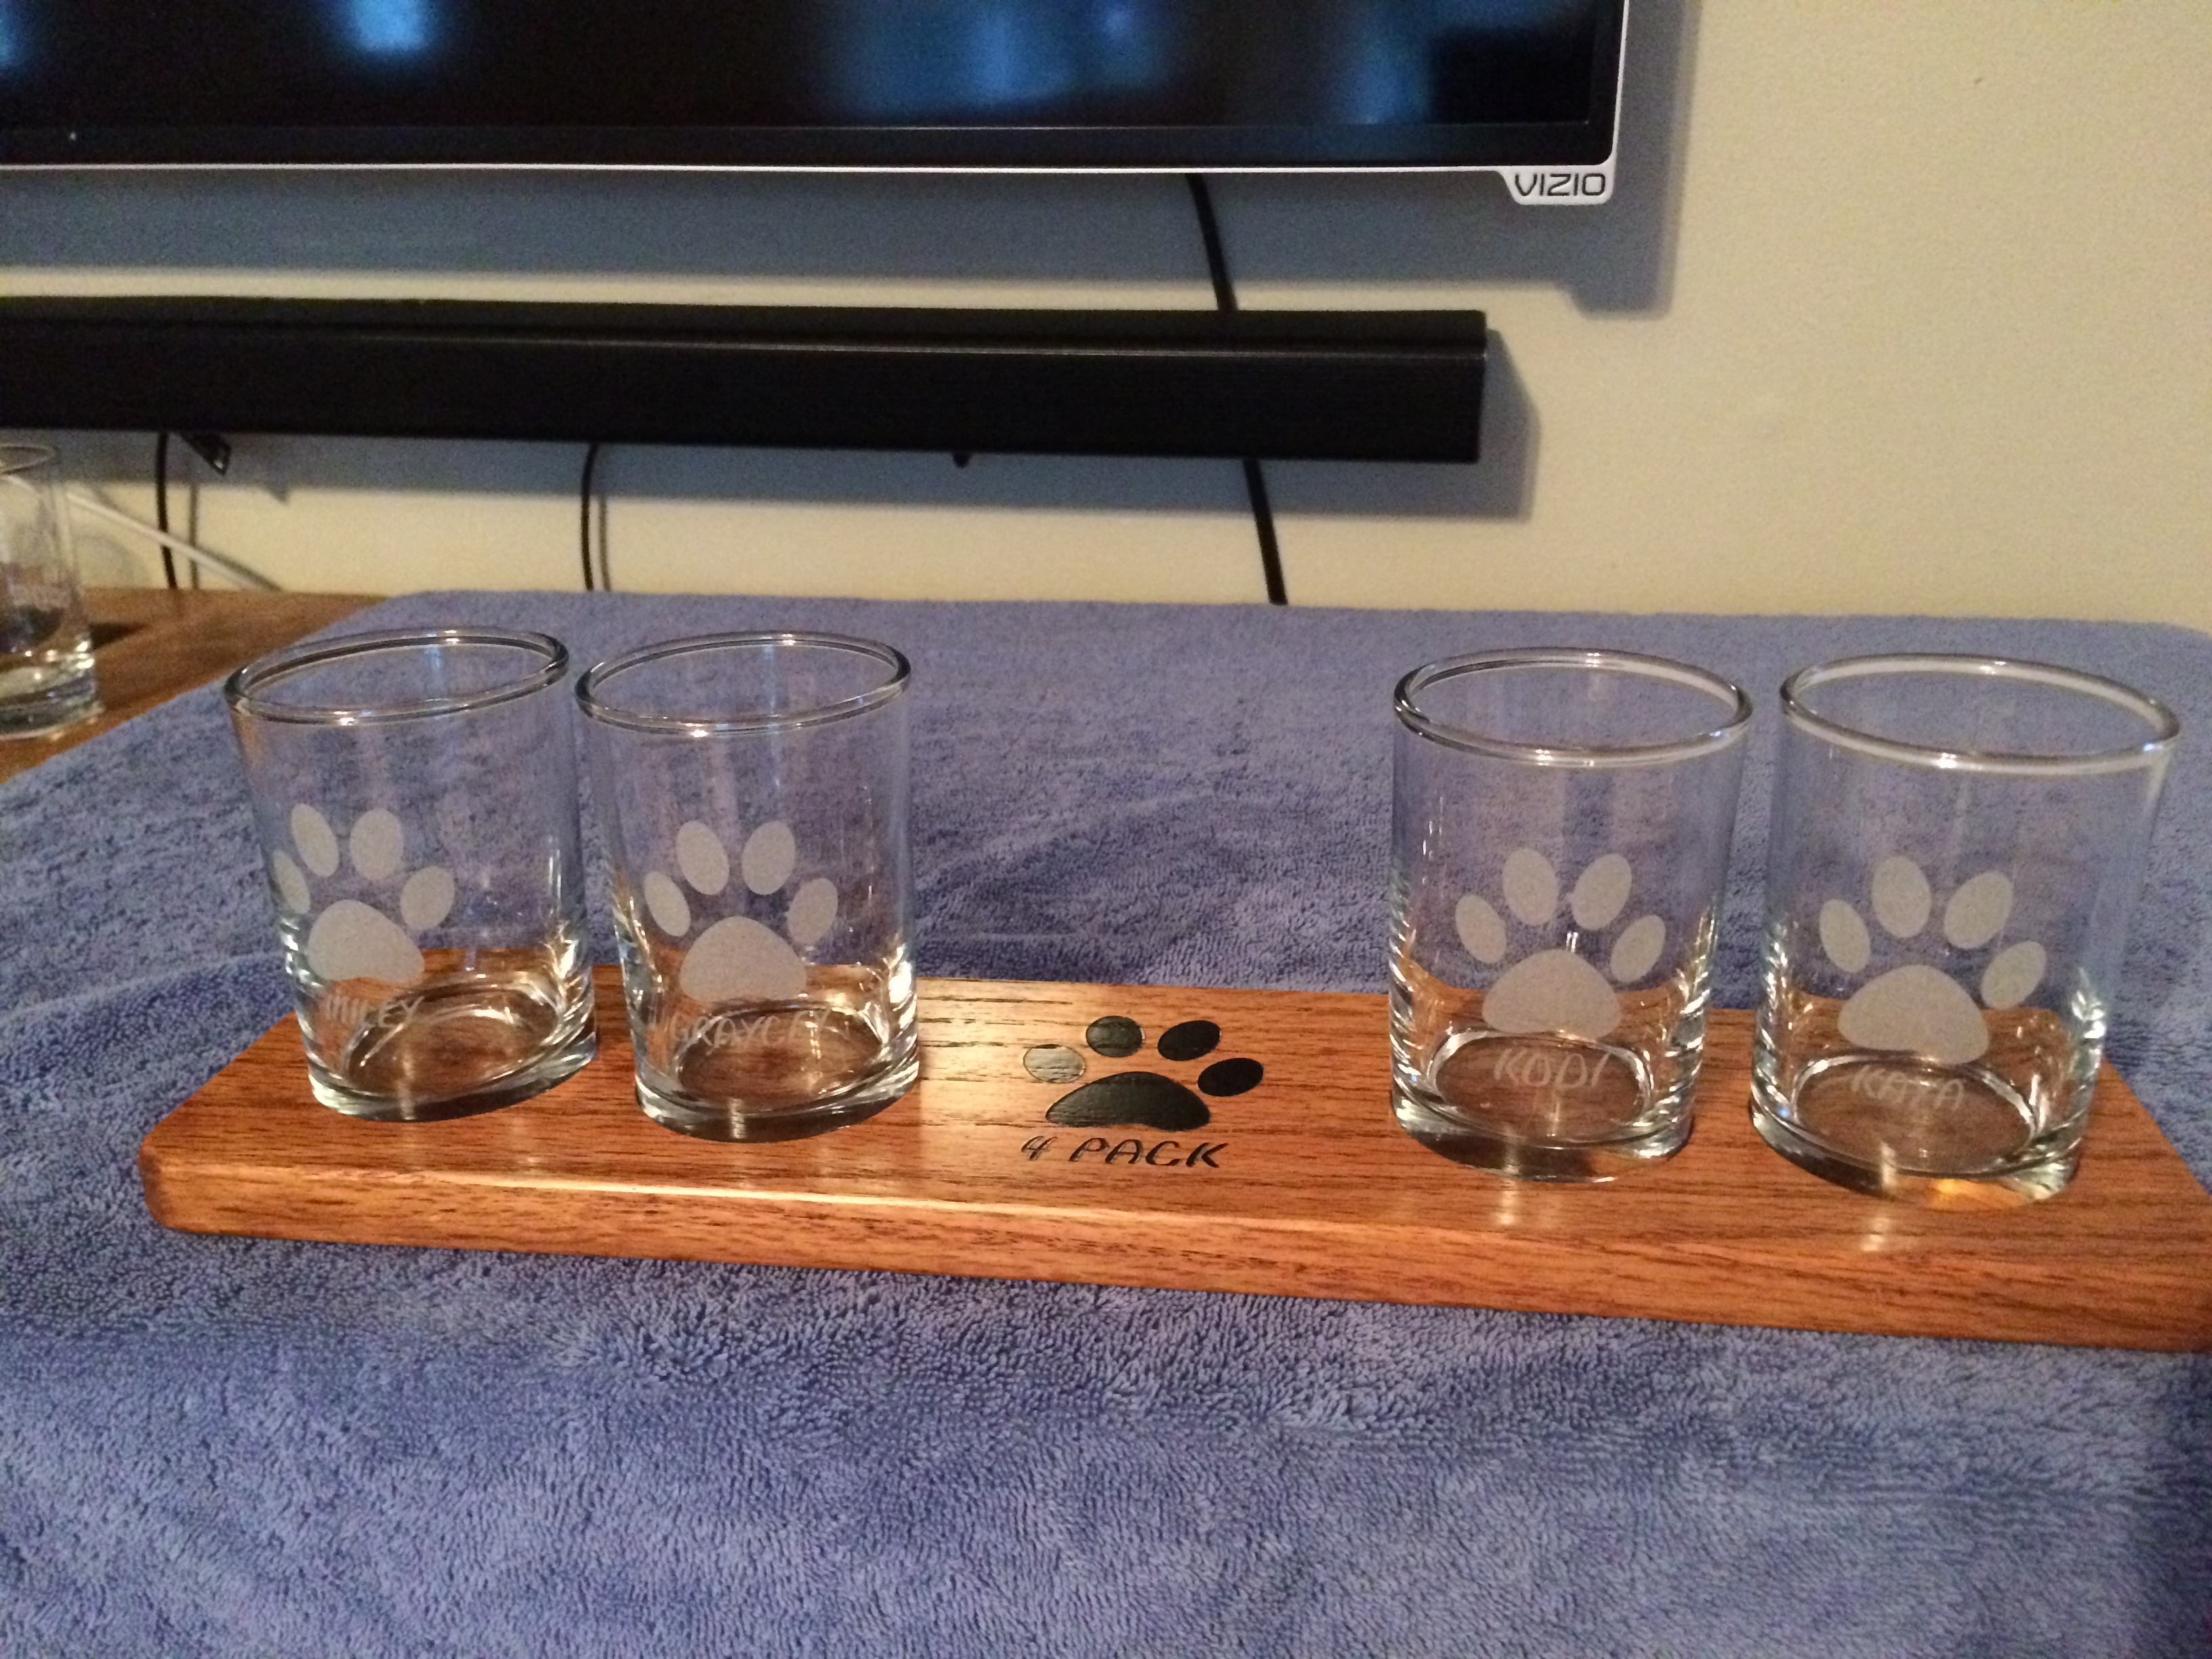
Here is a set of flight glasses with a very simple design. Total time in the blast cabinet for each glass was probably in the 30-40 second range for all four passes.
Cal

-
1
-
-
This setup will get you a constant flow of media:
http://www.tptools.com/USA-Cabinet-Gun-and-Pickup-Tube-Upgrade-Kit,2320.html?b=d*8026
I have two cabinets, one is the Harbor Freight table top model. I converted both of them with this TP Tools upgrade and it makes a big difference.
I also blast glass and mirrors at 50-60 psi. I boost it up to around 80 to do Yeti style mugs.
As for media coarseness, play around a bit to see what you like. Personally I favor a coarser and deeper etch on glass rather than a smoother frosted look.
To each their own. Play around and see what you like best.
Cal
-
Welcome aboard Chris. I cannot help with the Cameo 3 or T Shirts either, sorry about that.
I might be able to answer questions about stencils on wood though. I have done a bit of that.
I am sure there will be some folks along who can offer some specifics for you,
Cal
-
Welcome aboard Trina. What type of work do you plan to start doing?
The only advice I can add to the above is the color of that first roll. I might be just me, but I find that white is a very difficult vinyl to work with. It is very difficult for me to find and follow the cut lines while weeding it. For my work I usually stick with most any other color.
Cal
-
Excellent job!
Cal
-
Welcome aboard Jedi,
Cal


happy happy
in General discussion
Posted
And, in all ways, prosperous...