

darcshadow
-
Content Count
3,048 -
Joined
-
Last visited
-
Days Won
208
Posts posted by darcshadow
-
-
Just to be clear, you are selecting all the objects before hitting the weld button, correct? Does the weld option work for other files or shapes you draw yourself? No idea why it wouldn't work with this file, but it could be something weird with the svg.
FYI, that font appears to be from the Vine Monograms Font Family from Harold's Fonts. Don't know what you spent already, but you can buy the font for $20 and make as many different monograms as you like.
http://www.fontbros.com/families/vine-monograms/?code=harold
-
 1
1
-
-
License Plate USA is pretty close but I'm guessing California is actually custom and was based off of License Plate USA.
-
1
-
-
Pretty sure he's just being funny.
-
If you could take a screen shot of what your monogram looks like in both normal view and wireframe view that might give us a better idea as to what is happening. Or post the SVG file and we can take a look at it and try to figure out why when you hit weld it disappears.
Also, if the monogram is just a simple vine font, you could create it yourself rather than buying it from some one. There are several vine fonts for free, just need to install one and start playing around with it.
-
1
-
-
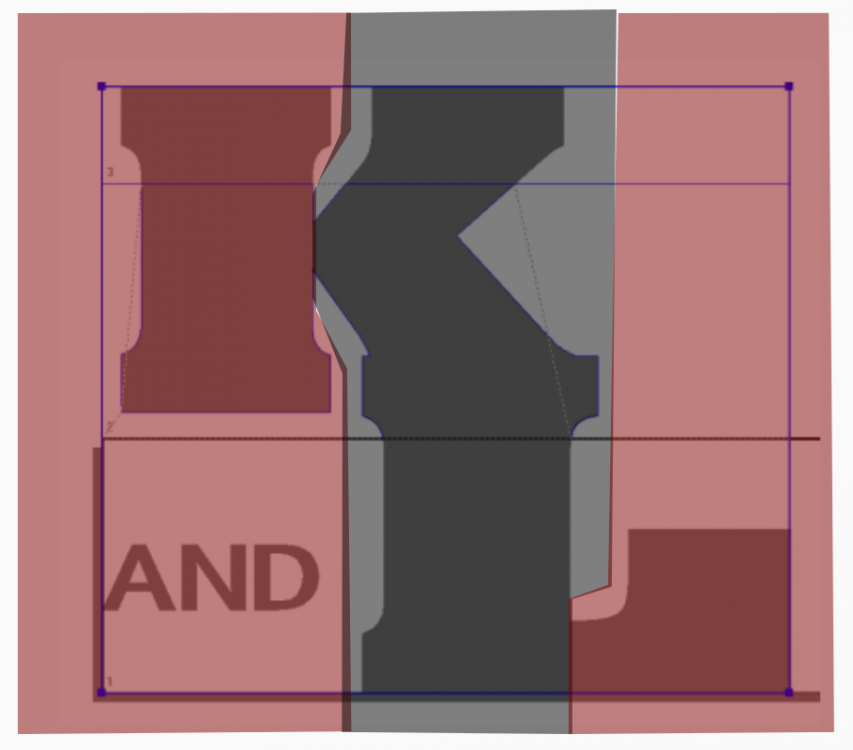
In SB you will want to draw a box over the area you don't want to cut and then use the punch command. This will delete all but the portion of the drawing you want to keep, you'll need to delete the box I believe also. Do this 3 times with a bit of overlap on each one and cut the image as 3 separate cuts. I would also suggest making the boxes cross the design at the small points like in the drawing I'm posting. Also, I would suggest adding alignment marks, I like diamonds, to help line everything up when you piece it together.
-
2
-
-
Maybe slow the cutter down. I know on mine if I try to run it to fast I can get a stair-step kind of cut on diagonal lines.
-
Once you get the cut right, weeding shouldn't be too hard. The examples you posted don't appear to be that small and shouldn't be too hard. I know I've done smaller on my MH. Getting the Blade depth correct is the key, that and software that can do overcut and you should be good to go.
-
1
-
-
I don't understand this problem. I don't use the program but from what I gather it does cut what is on the screen, just the bottom of the screen is not the side on the cutter you think it is. Once you get that straight in your mind it'll all come out just fine. The problem here is, who decides which side of the plotter is the bottom? Is it the width of the vinyl, or the length, if it's the length is it the left side or the right side? Any option works equally well, some like one way, some like another. The programs picked one and it's just not the one you would of picked.
As in the example posted above, the bottom left of the screen, is the 0 point on the cutter, moving up on the screen moves the cutter across the width of the vinyl and moving side to side rolls/unrolls the vinyl. So if you just visualize your preview screen rotated to the right 90 degrees it'll match up with what is on your screen. And that would be the quick and simple fix for the programmers, just rotate the entire preview screen.
-
+1 for Inkscape, and with the new cut extension it is an all in one program, although the cut abilities are a bit lacking it's the only free cutting program I have been able to find.
-
1
-
-
Just a guess regarding resolution settings, but I would assume you'd want to match your design resolution to the capabilities of the printer in question. If for example the printer can only do 300dpi, then designing something at full scale in 900dpi is not going to do you any good and will force the software to down sample the image in order for the printer to be able to handle it.
-
I don't know how to fix VM Pro, but if no one else can solve it, you can create a simple batch file that will delete backups every time you start the computer, or you can schedule it to run every so often.
-
Nice, those look great.
-
Happy to help
-
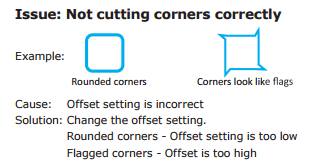
What cutter and software are you using? There should be a setting in the software someplace regarding offset. 0.25 is the standard staring point. Rounded corners usually mean you have to little offset.
-
3
-
-
Don't know if it's your cut file, or your cutter settings but your corners look a little rounded off. If it's not the file you may want to take a look at your offset settings for the cutter
-
2
-
-
Could be a software problem I guess, never tired cutting tiles with SB. You could always manually break up the image and make it so that it will fit on your vinyl.
-
1
-
-
It's about that time to re-watch one of the best Christmas movies ever...Die Hard.
")
-
1
-
-
Most likely either a memory or a static issue, I would guess static.
-
Yeah, when they drop it and can't find it they'll come back for another one. ha!
-
1
-
-
5A supply won't hurt anything, but for a run that short you only need about an amp, if that. Just an FYI.
-
1
-
-
Just found this posting of how someone got it to work. Although the preview doesn't work in Windows. So given that, and the only other reason I would want InkCut is for the advance after cut option doing all this to get it to work is quite a bit more hassle then it's worth to me.
QuoteThis is how I got Inkcut to run on windows step by step.
* Install Inkscape (0.48.2)
* Install Inkcut (1.0)
* Download GTK+ bundle (http://ftp.gnome.org/pub/gnome/binaries ... _win32.zip)
* Copy bin, etc, lib, share from the zip file to your ...\Inkscape\python directory
* Download PyGTK (http://ftp.gnome.org/pub/GNOME/binaries ... -py2.6.msi)
* Extract files from msi installer (http://blog.dotsmart.net/2009/05/13/unz ... msi-files/)
* Copy the extracted folder (include, Lib, Scripts, share) to your ...\Inkscape\python directory
* Edit Inkscape:
.\inkcut\app\bin\device.py
Comment out line 27.
.\inkcut\app\main.py
Comment out line 143 to 148.
Comment out line 165 to 167. (This removes scanning of serial ports but I have not been able to get it to work on windows 7)
Add after line 167 (This will add the ports in the array to your settings. My plotter is located at port COM1 and I could stop there but why not be able to use a couple of extra?):
> ports = ["COM1","COM2","COM3"]
Comment out line 241 to 252. This will remove the preview from within the extention, you can still use preview in Inkscape and I hope to solve the preview issue.
http://www.inkscapeforum.com/viewtopic.php?f=31&t=4987&start=100
-
Cool, so I was mistaken in my understanding that what is built in was just a version of inkcut. Still though, they are pretty close to the same and the developer of the extension has plans to put a preview window although his posts says he needs some help from a C++ programmer to get it working. I'd like to see the advance feed after the job is done rather than returning to home.
If you ever figure out how to get Inkcut working in windows post up. I'd be interested in trying it out.
-
In order to allow Inkscape to send the plot command directly to the plotter, you will need to install Pyserial as mentioned here, https://www.timewasters-place.com/inkscape-and-plotters-the-3rd/
-
I believe what is now built into Inkscape is pretty much Inkcut and killed the development of Inkcut as a separate plug-in.
Here's a link to the guy that did the development of the Extension.
https://www.timewasters-place.com/your-cutting-plotter-and-inkscape/

cutting issues
in T-Shirts and/ or Garments
Posted
Judging from the screen shot it appears you bought a file that contains individual letters, and from the image of the letters it appears to be that Harold's Vine Font I mentioned above. Don't know for sure, but to me, this seems like a copyright violation on the seller's part. Appears what they have done is bought the font, then typed out each letter/symbol, converted them to shapes rather than a font and saved the file off in multiple formats. Just for future reference, be wary of "fonts" that are not an actual font format, .TTF or .OTF are the two most common.