

darcshadow
-
Content Count
3,100 -
Joined
-
Last visited
-
Days Won
216
Posts posted by darcshadow
-
-
Vinyl is actually the cheapest part of the whole thing and more often then not can all but be ignored when figuring price. Figure the time involved, how much you want to pay yourself per hour and go from there. For example, if you pay yourself say $50 an hour and a design takes you 0.5 hours to design, cut, weed, and tape up then you'd charge $25.
Size doesn't really matter, If the design is 5"x5" and takes you 5 hours to design, cut, weed, and tape then you'd charge $250. However if you have a design that is 6'x6' and only takes you an hour to design, cut, weed and tape then it'd only be $50.
There is one minor problem with this logic though, and it is that the custom doesn't think in terms of time, only product and they're willing to pay more for a larger product even though in reality it's cheaper for you to make. So even though the math above says $50 for the 6' design, you could very likely get away with $100, or even more depending on the market and your customer.
-
 1
1
-
-
Just a comment from a design stand point, do you really want the flag design showing through the skull design? Unless the skull is glass you wouldn't be able to see the stars and stripes.
Changing the design in this manor would also make the inline unnecessary and the creation of the design a bit simpler.
-
1
-
-
That seems like a flaw in the program design to me.
-
On 3/3/2018 at 3:48 PM, eprcvinyls said:Still cant get this.. Now he wants the puzzle of the back and i just cant get it just like it is, it has round curves mine end up stright.
Is there a free program that does this eisier We need to get this finished like yesterday
The puzzle pieces, while time consuming, should be pretty easy. Start by drawing a box, then draw a circle and either weld it to the box, or cut it from the box depending on the piece you're trying to make.
If you're buddy created that in Paint, he needs to get a better program, just image what he could create with a real drawing program.
")

-
side note, from a design stand point, I think I'd take off that extra bit at the top left, it doesn't flow with the design. The whole design looks as if it could be a single brush stroke, except for the extra bit, something like this flows better, in my opinion that is.

-
1
-
-
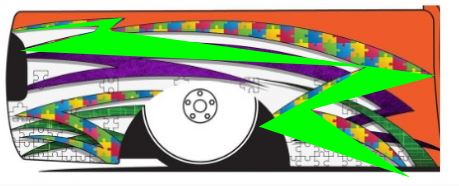
It looks like you tried to put too many nodes. For this image, just put a node at the points.
The green circles are where I would put my nodes to start with. Note, some of the points are actually off image. The wheel well for example. You can tell the intended design would have a point about where I marked.
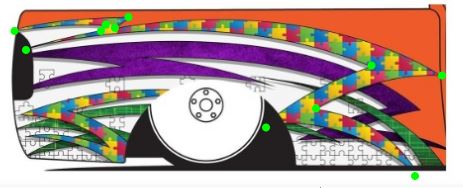
Once you do that you will end up with a shape like this.
Then you node edit to adjust the nodes to be exactly where you want, and change the straight lines to curves. If you do this will a fill as I've shown, it's easiest if you set the fill to be slightly transparent so you can see the design below. Keep at it and you'll get the hang of if it. This quick ruff trace took about 3 minutes.
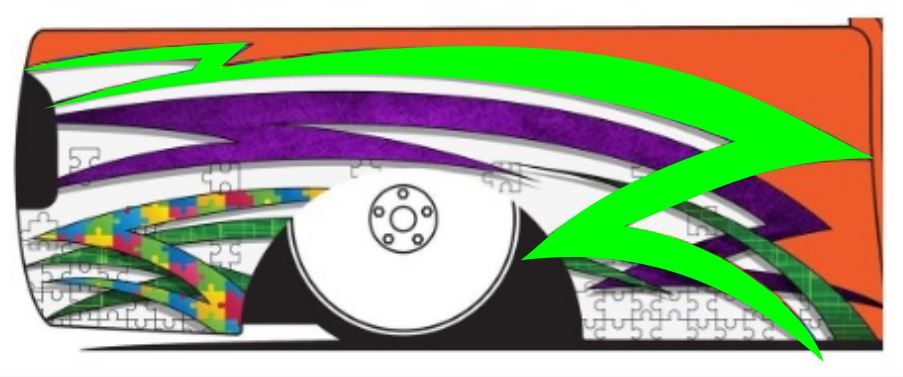
Now you can go back and cut out the portions that you don't want around the wheel well and the bottom. However, if this is being installed on a truck, I'd leave them there, and then just trim the design to the truck after it's installed.
-
2
-
-
The bezier tool is a little different, but I just put the points in the general location of what ever I'm tracing. Then once the shape is formed, go back and zoom in and node edit to move the individual nodes, adjust the curve, straighten lines, etc.
And if you need to have two points exactly lines up, you can always copy and paste the x or y coordinates of the points you are wanting to line up.
-
1
-
-
Looks like the tool in VM is a polyline. There's a video in this posts that I think will help.
-
Looks good. For future reference, if you can identify and find the font, recreating text is always better than tracing. And the design in that graphic would be easy enough to recreate as well.
Someone that uses VM will have to chime in, but I'm sure VM has a bezier equivalent tool.
-
When you resize, select just one of the purple shapes at a time. Here is the tail gate with the puzzle traced in yellow. I then copied both the purple and yellow, moved them up, and resized to 72x24.
-
Size is just the size of the original picture. When changing the size be sure you have the aspect ratio locked so that it scales both the width and the height.
You'll want to copy copy or move the vector up or over so that's it's not on top of the raster.
-
A manual trace would be the best way. Open the image in your editor of choice and use the bezier tool to draw the design over the top of the image.
Here's a start, I've manually traced the purple part, took about 5 min.
-
Is it only letters that it does this to?
Have you tried converting the text to paths/curves before sending to the plotter?
-
That's the key, having something in the trace that is a known size then it's a simple matter of scaling the vector. SB has a great feature for this where you draw a line on the portion of the graphic that you know the size of, enter the size and bam, you've got your image sized correctly.
-
1
-
-
While getting product to the customer faster is always better, they are ordering custom shirts and a reasonable lead time should be expected. I know if I were to order a one off, I'd wouldn't expect it to get shipped for probably a week. And if you get busy enough, you can place the order for shirts, and by the time you get all the orders ahead of it done the shirts you ordered will have arrived. Ah, the benefits of being too busy. lol
-
1
-
-
It's usually called something like "extra weed lines". The guys that use VM should be able to tell you where to find it easily.
-
I know that is what was asked for, but to me, that looks like it might be a bit on the wide side and the names will be wrapping around to the sides when the shirt is worn.
For your own personal experience, ask for a photo of the kids wearing them so you can get a feel for how something looks laying flat, vs how it looks while worn.
-
4
-
-
There should be multiple ways to accomplish this. I don't know VM but I can tell you what to look for.
Option 1: You can node edit the image and delete all nodes you don't want.
Option 2: Most programs allow you to break apart or separate an image. You will then be able to delete the parts you don't want. In Inkscape the tool is called break apart under the path menu.
Option 3: As you said, draw a box around what you want to keep and use a tool keeps the intersection of the two objects. In Inkscape the tool is called Intersection located under the path menu
-
Some cutting software has settings that will add extra cuts like this automatically to make weeding easier.
-
I just happened to post about over cut and blade offset just the other day. See the referenced post for examples of over cut settings.
-
1
-
-
I'm not clear what you were doing with the packing tape, but in regards to sticking vinyl back onto the backing paper, yeah, that will never stick as well as before. The idea of the backing paper is that vinyl doesn't stick to it.
I have had to do as you describe though, messed up a small part of a design so rather than cut the whole design just cut what I need. So long as you're not waving the backing paper around after you lay the vinyl on it, the vinyl should stay put well enough to get your transfer tape applied.
I've actually built multi colored decals like that. I cut the entire design in one color, weeded out everything except that color, then cut the other colored parts and using the slight impression left on the backing paper from the first cut used them to line up the other pieces. This way I was able to get a multi color design that was a uniform thickness.
-
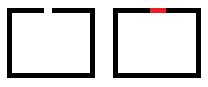
The blade offset is to account for the fact that the point of the blade is not actually in the center of the holder. To test if an adjustment is needed cut a a simple square, look closely at the corners and compare them to the image below.

Overcut is how far past the start top point the blade will travel when completing a cut. The value cutters will not always complete a cut, the overcut setting compensates for this by traveling the specified distance extra to ensure that the start and stop points meet or overlap.
Advance after plot is a nice option, it simply advances the vinyl out so that you can easily cut it off. Not sure about the SC, but I know the MH when it does this, the origin does not change. So unless you reset the origin the cutter will back up the vinyl, and since you've cut it off, the vinyl will fall out of the machine and the blade will cut into the cutting strip.
-
1
-
-
11 hours ago, eprcvinyls said:anything Small it does great but anything longer then 10 inches it does funny things. and I guess I will forget using my scrapes with this thing guess i break down buy the wife a Silhouette and let her use my scraps this thing makes those things twist and turn really bad.
i stuck a 3 foot roll on and it looked straight i now know how to make it feed so feed whole thing and it went over that whole inch.. i backed it back and moved it around tried again it was a little better but still off about half a inch going the whole 3 foot.. my rolls are to short to stay on the rollers tho maybe that is some of it?
I don't have an SC, but I'm pretty sure you should be able to cut pretty small scraps with no problems. Just needs to be big enough that the rollers can hang onto it through the whole cut.
-
Two obvious things to check, blade exposure and pinch rollers. Make sure you have the pinch rollers position over the ruff part of the lower roller. If it's not, or it's on a smooth part it'll cause problems as you're describing.
Follow Ms Skeeter's instructions for setting blade depth and pressure. Speed settings start slow and step it up till you're not happy with the cut results then slow it back down one step. More detailed designs usually should be cut at a slower speed.
why is my traced image cutting doulble around it??
in VinylMaster CUT, LTR, PRO & DSR
Posted
I suspect when you drew your line in Inkscape, then imported the desgin into your cut software the line was converted to an object and you now have two lines, one on the inside and one ont he outside of your line drawing.
If that is the case, in Inkscape, remove the stroke color, and add a fill color. To do that, select the shape, then click a color option on the bottom of the screen to set the fill, then hold down the shift key and click the little red X on the left of the color selection and it will remove the stroke color. You rarely want your final design to have strokes. And if you do want a line like that, it's better to convert the stroke to a path.
Till you get the hang of everything, it's also a good idea to take a look at your design in wire frame mode before hitting the cut button.