

Wildgoose
-
Content Count
6,515 -
Joined
-
Last visited
-
Days Won
293
Posts posted by Wildgoose
-
-
For all who do HTV work. I recently received a new 50yd roll of Siser Stretch White and the application instructions on the sticker have changed from 305 for 10-15 seconds to 320 for 20 seconds. I called the tech line and asked what was up. They said they have had too high of a percentage of lifting and decided they needed to make an adjustment to combat problems. So this is retroactive to all the stretch products and not a new adhesive. I know that the stretch line uses something different than the regular non-stretch as evident when trying to remove a missed weed item after install. Almost impossible to do on the stretch where you can just reheat the regular non-stretch and pluck it out.
This will affect the workflow a little especially when working with a combination of stretch and non-stretch. Siser North America tech help suggested a middle of the road approach in these situations. Reduced dwell time at the higher temp. I know from personal testing that I did on my own that Siser of either variant can handle a lot more heat than they recommend. I did some tests clear up to 350 deg and did not see any visible signs of trouble other than just a touch of adhesive coming out along the edges that was visible if layered. At the time I was trying to determine if I could layer the Siser with some Stahls products that needed 320-330 degree temps. Color choices being what they are I needed one from Siser and one from stahls. it was the only way I could get the correct color schemes on a certain job. It layered successfully without issues.
I am a little bummed out about the need for this change because it has been one of the best parts of the Siser Easyweed line that it was at the same time and temp for both of those two products keeping the workflow simple and I prefer the lower temps especially when pressing 100% poly products. Just wanted to get word out if no-one was paying attention to their application instructions (which I would ordinarily have not bothered looking either but it caught my eye accidentally).
-
 1
1
-
-
I think his question is the other roll. What is it? Maybe look back at what you ordered and write it inside on future unmarked ones would be smart. I for one will pay more attention to my own rolls since I read this.
-
2
-
-
IMO if you take reasonable efforts to determine that it's not out there (Skeeters instructions would qualify I would think, I am not an attorney though) you would have done due diligence in attempting to stay on the high road. If you get a Cease and Desist letter you'll know you missed something. That's my $0.02. I agree with darcshadow that most basic phrases are safe but there are works of word art that people put a basic phrase into beautiful design that would be infringement if you copied the design layout or even if it was derivative it would be technically breaking the letter of the law. If you have some shirt sayings ideas that are unique or a layout and look that is your own those are the best.
-
Here is one that shows some pics.
-
1
-
-
Just now, Mike Roark said:I have the MH871-MK2 model. Does anybody have any pictures if reference to the rollers everybody is talking about. When I hit the cut button in the software, the cutter begins doing the cut as though it sees it. It foes back and forth as though cutting, but not actually touching the material. I have tried with the pen and then blade. Is this fixable?
Is the knife dropping down during the cuts and back up to the next object? If it is not moving up and down then there is something related to that messed up. If it looks like the little arm that holds the knife or pen is dropping down but it's just not reaching the material then the carriage issue is probably what's up pr you have your blade holder improperly mounted. I don't have that cutter so I don't have pics but I have seen others post pics about this issue. You can probably find the threads with some searching on the forum.
Initial startup is probably the most frustrating time of being a new cutter owner. Too much new tech and not sure whats actually supposed to happen. Be patient and you'll get it going with some time.
-
Cut at once as in load several colors into the machine and have one cut file? Not happening, or at least not very effectively.
You can cut weed and then either install in layers or layer then install all at once. My experience has been if they overlap there tends to be more bubbles when pre-stacking but when each color layer has it's own space with clear space between each layer it is great. If the application is going on a compound curve then definitely worth pre-layering and just put up with the bubbles. They can be popped and/or chased out if they are of any size. The super tiny ones will usually disappear after a few weeks of expansion and contraction. As you gain experience you'll have less bubbles. I know I really sucked at first but practiced and got better. Still a newb compared to a lot of those pro's out there.
-
1
-
-
Welcome from Idaho.
-
1
-
-
That is your application? Is this like a stencil or something? If you are trying to transfer vinyl over it will need to be strong enough to get the vinyl off the carrier. Finding a single sheet os going to be a challenge more than finding a low tack app tape that only comes in really long rolls.
-
2
-
-
Most HTV that will block migration are thick and stiff. Some are in the middle and handle migration pretty good without sacrificing "hand" which is what we call the feel of the product on the shirt. Siser Easyweed is about as good a middle road that does a pretty good job at not migrating too badly. Most problems come when trying to use white or a very light color on sublimated blue, red, orange etc.... You can also work around it sometimes. Like if you have a white number with a dark outline second color you might stack the two colors so that background creates a color block from the white top color. Most times when I build two colors I put the center color in and actually have the background be an outline only that goes over the top. When doing this it's best to leave some bleed (overlap) where the outline can cover the edges of the inner color because everything shrinks and does weird things when it gets hot. It produces a better hand not being truly layered but if fighting dye migration then the stacked method might be a way to combat this.
-
1
-
-
17 hours ago, gman1968 said:ill go for the TC.
As im a COMPLETE newbie , it may be useful documenting my journey for others.
Let see how this goes.
ps. ive messaged them to see what server cutters they have
Thanks for all your help.
Nothing wrong with starting out with something affordable. I did. I personally think learning on a budget cutter makes you a better operator. The budget cutters have to be "tuned" a little to cut clean and there are limits to what they will do on large graphics as well as tiny ones. Learning this limit you will be much more appreciative when/if you ever upgrade to a servo machine. Doing this fine tuning repeatedly will train you so you learn to recognize what's happening if something doesn't come out right.
You sound like what you are starting out with will be one at a time items and that's the best for the budget models. When you start getting into multiple copies of things the memory and tracking are less so they have trouble. My budget model would only safely do about 10 copies of small left chest tee shirt logos or it would wig out and mess things up. I had to sort of hover over it the whole time ready to push the abort button if something went wonky. When my workload started becoming increasingly parser orders I upgraded and now I just load it up and set it to cutting and walk off while it works. I had a couple orders that were several hours of cutting that worked well into the night while I went to bed.
-
2
-
-
Ok so they are currently out of stock at my normal supply shop and he is moving his business so it could be a little bit before they come available again. It's a convoluted situation with his supplier who has been an older retired gentleman who hand ground these and he hasn't been able to contact, as in possibly retired permanent but I will post some info as soon as I can get it figured out. In the meantime I am working another angle which should prove fruitful.
-
2
-
-
8 hours ago, Wilson said:Thanks for the replies!
So is the material for the sign face just white plexiglass or is there a particular type to use? Doing a little research online there seems to be quite a few different types ranging in price from about $100 up to over $800. Not being familiar with the different types it's hard to know exactly what I'm looking at.
Plexiglass of more durable and from what my local supplier told me is usually used if the sign is low enough for someone to easily hit it with something because it will take a hit better. The Acrylic will resist the sun better (yellowing) but is more brittle.
-
1
-
-
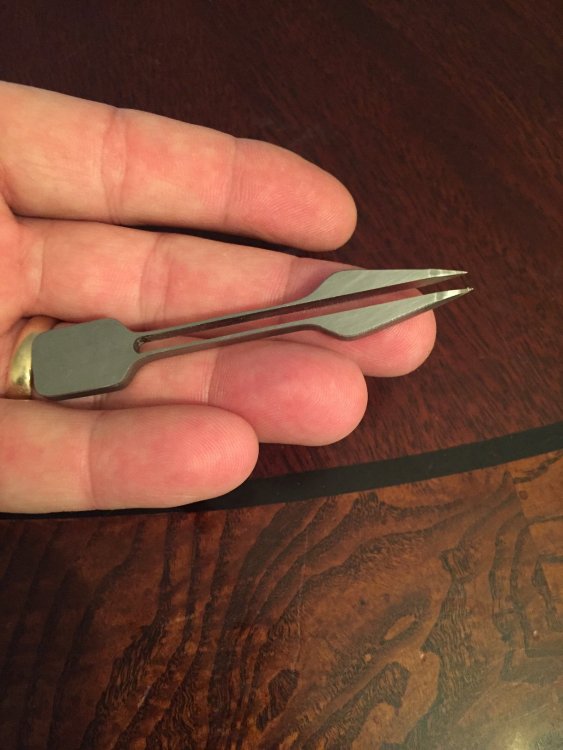
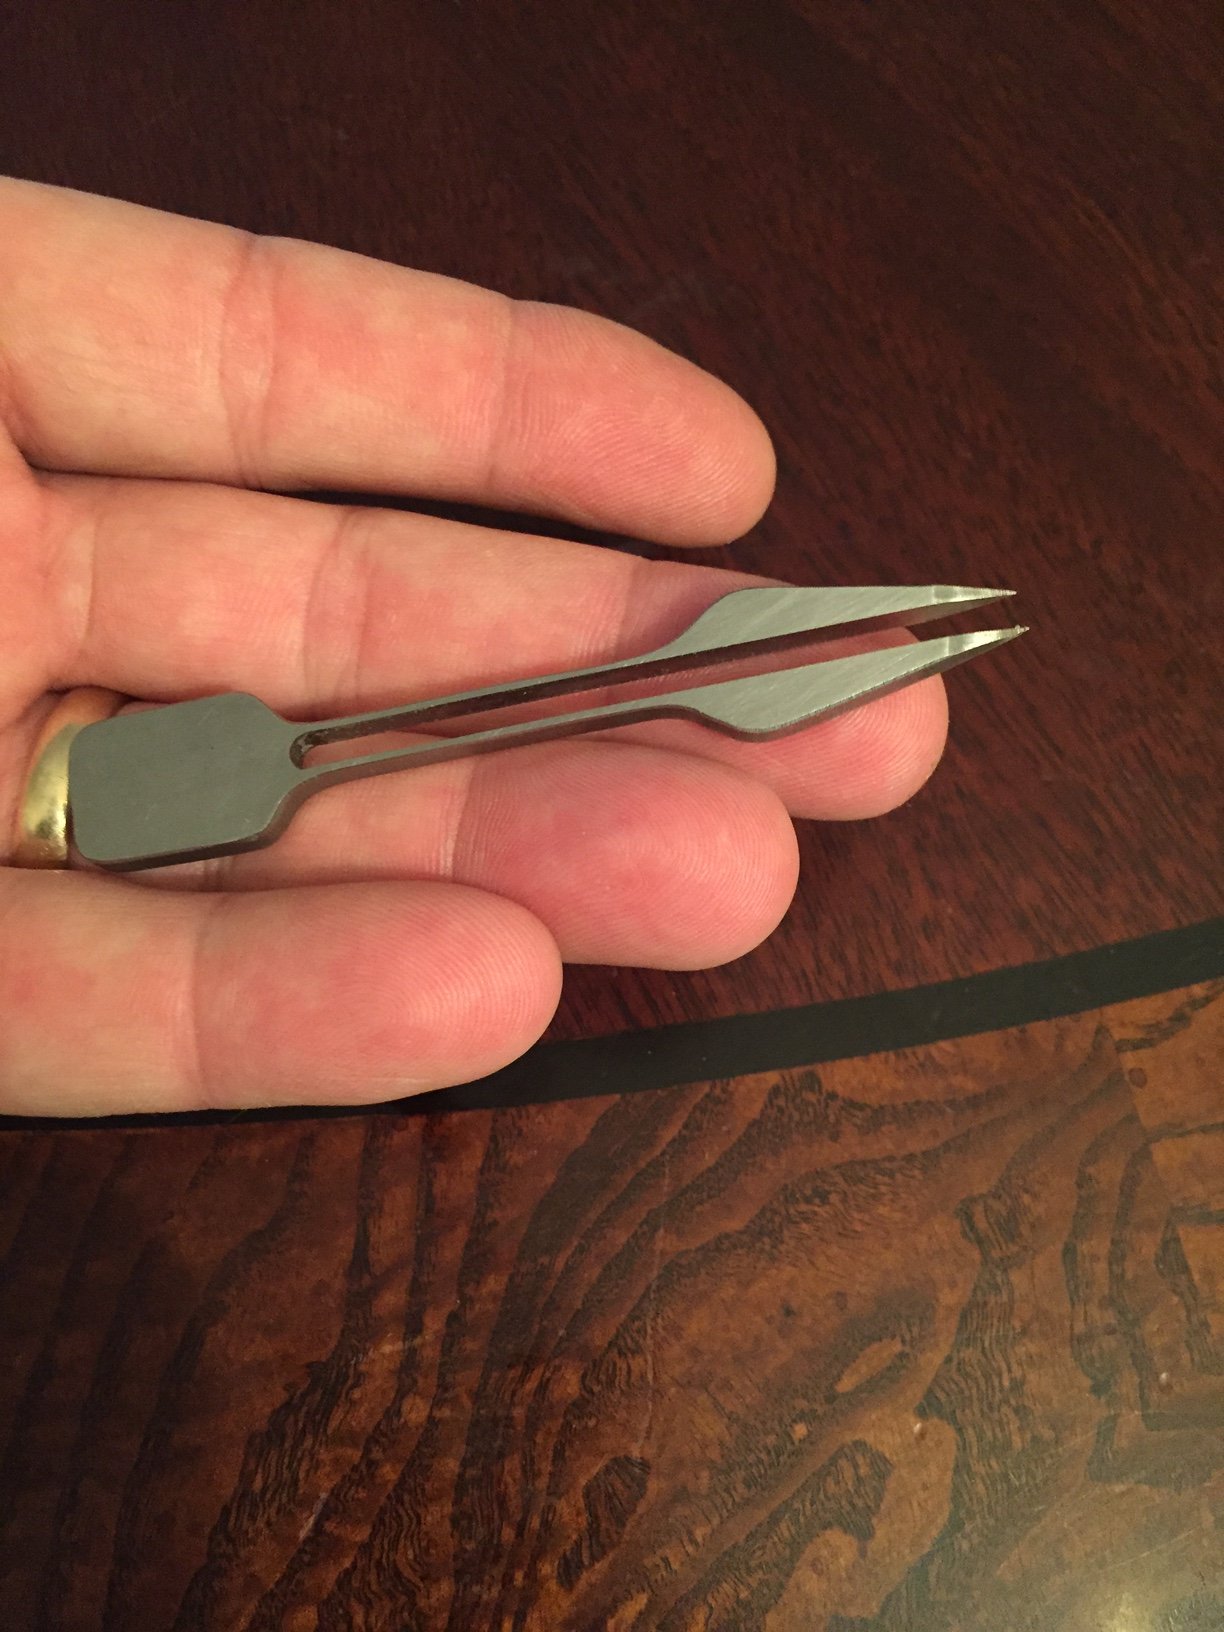
3 hours ago, Wilson said:Wildgoose, you got a link to them? I prefer tweezers as well but the couple pair I have can be lacking in the grip department. And searching Amazon for something like this can be a nightmare...
I will PM you about them.
-
I am a tweezer kind of guy. I have a large pair I bought from USC that works great on adhesive vinyl but for HTV which I do 95% of the time now I have these customer ground machinist tweezers. They are custom cut from some sort of hardened spring steel. They a little aggressive for regular adhesive vinyl but for heat transfer they do a really great job of grabbing hold and pulling it up off the sticky carrier. You grab them with your fingers up on the wide part of the triangular tip and it gives you a LOT of pinching force. Made specifically to dig out metal slivers the machinist guys get in the shop. My girls think they're the best thing since ice-cream for plucking eyebrows and such so they wander off a lot. I have bought several pairs. Not cheap at $25 each but like any good tool are worth every penny. When I can't find them I get really grumpy.
-
1
-
-
That substrate is usually either something like lexan or acrylic. Not likely to hold up to trying to save it. Better to replace it. The few (3) I have tried to mess with had become brittle with age in the sun and cracked. I wasted a lot of time on the first two which were a double sided sign only to have it break on me. It was for a family member who owns a business.
The vinyl you want is translucent and allows light to come through. Regular vinyl will look dark or even black at night when it's bulbs are on.
-
2
-
-
gman - Just another thing to check. The MH is problematic as mentioned.
SignCut has live tech support and they are REALLY good. You have to put in for a support ticket on the website and they will usually get back to you pretty quickly. They will get the program side sorted if you have anything within it set wrong. That will eliminate the software side. I am one of a very few who use the SignCut software here on the forum. I do it because I run mac computers AND windows and it's one of the few that will run on both.
I would try and make sure your choice of measurement increments within SignCut match the metric .25mm that are on the blade box. Can't remember if changing the measure also changes all the same with the offset. Be sure the offset is 0.25 and not accidentally 25 is what I'm saying and if you happened to mess with the increments such as switching to inches (not likely since you are UK based) because 0.25 inches is a whale of a difference than 0.25mm. This may have nothing to do with whats happening but it's possibly something to double check.
The other possibility is making VERY sure the driver is the correct one. SignCut has tons of machine choice options in the cutter set-up menu. Incorrect choices here could also cause major problems.
Someone mentioned starting out with a circle or a square and see if it will cut it ok then add another object and see what happens. You're probably getting frustrated and upset about now, I know I would be.
-
1
-
-
I would at the very least get in touch with a dealer and get the real info. They may tell you that it's fine for regular too. I can't imagine needing 450g of force for any paper cutting so it is at least based on the regular platform. The up and down force thing is how Summa does their perf cutting for contour cutting printed stickers so that may just be a setting. I am making the assumption that you found a good price on a used one somewhere is why you are looking at it. If buying new then don't waste your time.
-
That's pretty wild. AP = Apparel Pattern. Looks pretty specialized and I would wonder if it can be used for vinyl or not. Definitely not what it was designed for although the rest of the spec seem similar to the regular CE cutter.
-
Kevin if you sign up for the forum you don't have to wait until we approve of your guest posting.
Here is some pertinent information from a post last season that should help you. There are a couple different scenarios discussed about similar things to your design.
-
Not sure how they market them up there in Canada but the Summa S2 T series cutters are true tangential heads that steer the blade along the vector and are supposed to be remarkable compared to drag knife cutters especially when cutting things like you are talking about or small stuff. I have wanted one really bad just cause I'm a cutter snob I guess. Have not had the wherewithal to get chewed out by my better half for dropping that much cash on something I don't absolutely need. (the nerve of her questioning me like that, hurump) They only sell them in a very few dealers here in the states but I think it's more normal out of country. Worth looking at and I'd be jealous if you get one.
On the 750 grams force on the Titan I have always wanted someone to test this against an FC at 600. I kind of winder if it's accurate or not. FC's are renowned for dealing with thick stuff. I watched the Titan in a video running at supposedly 350mm/sec of such speed but my summa (drag knife version) runs about that fast at just 200mm/sec so it makes me wonder. Not dogging them because for the price they are still a good buy for what you get. I guess if you get an FC you can do the test in house, if you do definitely post some results. Inquiring minds what to know.
-
2
-
-
I always apply dry on flat surfaces. You are seeing the downside to cheaper cutters. There IS the possibility of stretching accidentally when applying but if you are using good paper app tape it's not all that likely. That is well over the size that you will have good results with. The budget cutters really struggle with large graphics over about 24 inches long and also with really small stuff. There is a reason people pay so much more for high end machines. My Summa runs over $3500 but I started on a $400 Chinese cutter. It still got the job done but Oh what a difference when I decided to upgrade. The results you are having were regular occurrences when I was using my P-Cut. I got pretty good at chasing where to try and overlap things so that there were places I could hand trim and not see the misses as bad.
-
1
-
-
So I went and looked through SIgnCut a bit to help me remember where things are located. Your Blade offset is in the CUTTER tab as are the Baud rate which is also very important to have right. You'll have to read through your paperwork to be sure of the correct baud rate.
The OVERCUT and some other options are found over in the cut menu when you press the little scissors button. Using the software force and speed settings is set in this area as well. In Advanced settings there is an option for tangential emulation mode and I would avoid using this at least to start with.
-
56 minutes ago, gman1968 said:Ive increased the force to 300???
300 Seems a little high but as Skeeter said each cutter is a little different. Your cuts look bad bad and I kind of think that you accidentally broke a tip earlier and that has added to the confusion. Happens pretty easy if you are inexperienced and most of us have done the very same more than once so don't feel bad.
I am a long time SIgnCut Pro1 user. Great program IMO, so good that I stayed with them after upgrading to a high end cutter. I am looking at your cut pic after the test and trying to even figure out how the long cuts that extend from the corners can happen. I am pretty sure those are from way way too much blade offset. If it were just at the start of an object it would be more like too much over-cut.
I don't know if you have another blade but if you do and have not already done so I would put one in and go through the blade depth setting again like before. When you use "some force" it should not be enough to cut all the way through the backing if the blade was long enough but enough that there is no question that you are getting the most of the cut that is possible with the blade set slightly less than the full thickness of the vinyl and backing combined.
After making sure you have that set about right then I would take a guess at pressure more around the 90 to 110 gr mark to start with and maybe even try at 70 or so just to be darn sure you don't overdo it and push through too far. Once you get used to your machine you will find that you usually run in one or two pressure ranges based on the type of vinyl. This is more evident on the budget cutters than on higher end machines for whatever reason.
BEFORE do the test cut for pressure make sure your blade OFF-SET is set around .25mm and your blade OVER-CUT at zero. The MH cutters have to be set within the SIgnCut program I'm pretty sure. Other models may have these tools on the cutter home screen and there is somewhere within SignCut where you choose to let SignCut control these settings or control them on the plotter.
Lastly, if the design is not copyright protected maybe you can upload the vector design and we can take a peek and make sure there isn't something weird goin on with it. The test cut had rounded corners but didn't look that bad compared to the next picture.
-
60 degree blades for thick material. Cut it at slow speeds too.
-
1
-
ISO Distressed Flag
in Graphic Requests
Posted
When it comes to this kind of stuff I have found that if I didn't have the skills or more likely the time to build my own I have good luck finding a sales deal at one of the vector sites. There are some freebies out there but they usually hold the good stuff back for a price. The only ones I have in my collection are ones I have paid for and therefor can't share due to copyright restrictions.