

OWJones
-
Content Count
2,798 -
Joined
-
Last visited
-
Days Won
84
Everything posted by OWJones
-
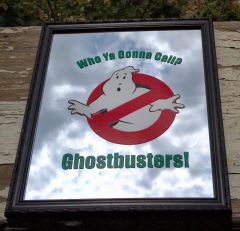
From the album: Ottumwa Decal
My first "real" cut with my new Graphtec CE5000-60 using Corel Draw X3 and Cutting Master 2 plugin. Also my first time to try and layer more than two colors of vinyl. It didn't come out perfect (my fault, not the Graphtec's) but that is why I do these sample pieces, so I can practice, practice, practice and maybe one day be half as good as the rest of you already are. PS. Graphtec package from US Cutter is AWESOME! -
You might also consider something like an opaque black border around the red letters - it will help add a little contrast to the letters as well as give you a way to safely cover any gaps. So far I've avoided using matte on cars because I thought the matte would be more likely to get dirty - I don't have any actual data to back up that supposition, but I'm sure someone on here has experience and will let us know.
-
Link to related story - http://www.hlntv.com...d-having-affair One of our reserve sheriff deputies was killed a little over a week ago, and as you can imagine that sort of thing doesn't get overlooked in a small town. When people on a local, public forum started asking about memorial window decals, someone mentioned my small start-up and next thing I knew I was opening my big mouth and offering to make the memorial decals fo' free - as in I eat the cost of vinyl, labor, etc. (it's a long story and it seemed to make sense at the time). So, of course things blow up completely out of control and the decals are selling as fast as I can make them (all the money is going to the "Shop with a Cop" charity in the deceased's name) and I'm getting requests to make them and mail them all over the country. Yay! Today I met with the girl's mother to present her with a stack of 10 decals for her family. I also cut one extra big and applied it to a 11.5"x11.5" tile for her (see attached). The good news I'm scoring tons of local good will and orders for other jobs are pouring in, the bad news is I'm almost out of green and sunflower vinyl (got some ordered) *and* I have to return to my *real* job first thing in the morning and work 10 hours shifts, so I'm going to be up until the wee hours every night cutting, weeding, picking and layering... fun, fun, fun.... Zzzzz..... Quick edit with something I overlooked - the 67-17 in the middle is her badge number which the sheriff's dept. has officially retired.
-
Is that, #758 on the "I didn't know you could do that with a vinyl cutter!" list of ideas? I've kind of lost track... Looks awesome!
-

New Graphtec with Corel X3 and Cutting Master 2 - everything rotated 90 degrees from preview...
OWJones replied to OWJones's topic in GraphTec Cutting Plotter Support Requests
I used Robomaster when I first unboxed the plotter, just to make sure it worked. Then I installed Corel Draw X3 and Cutting Master 2 and have been using that exclusively since... Whatever caused it to change settings, your sage advice enabled me to resolve it. -
So I'm trying to knock out around 50 3-color layered vinyl decals, which shouldn't be an issue, but for some reason my brand new Graphtec and I are not seeing eye to eye. I'm using Corel Draw X3 with the Cutting Master 2 plug-in and trying to cut a decal that is about 6"x7" and make several at the same time. I have the Media Size set to User Defined and 24" wide x 120" and I've cranked up the Copies number to 50. It shows that it's going to feed the vinyl and cut copies like this (where 1, 2 and 3 are all the same thing) 1 2 3 1 2 3 1 2 3 1 2 3 1 2 3 and so on for a total of 50 copies. Instead, when I hit send, it seems to think that everything should be rotated by 90 degrees and starts cutting 1 1 1 2 2 2 3 3 3 4 4 4 and when it gets to 4 it freaks out because it's going off the edge of the vinyl. I'm not sure if that is describing it correctly, but what is coming out of the plotter is 90 degrees rotated from what the preview is showing in Cutting Master - and I don't mean just the decal itself is turned 90 degrees, but the number of rows and columns is also rotated and so it's trying to cut 120" wide on a 24" cutter. Is there some obvious (to everyone but me) check box or button I need to press to make the preview match what is really coming out of the plotter? I tried cutting a single row of 3, which should have used about 7" of 24" wide vinyl - instead it decided to rotate everything and cut them one above the other and ended up using 24" of 24" wide vinyl - the right 60% of which was never used. I didn't have a lot of hair when I started this project, so I can't afford to keep pulling it out! Any help is appreciated!
-
New Graphtec with Corel X3 and Cutting Master 2 - everything rotated 90 degrees from preview...
OWJones replied to OWJones's topic in GraphTec Cutting Plotter Support Requests
Yay! Markwq saved my sanity and what was left of my hair! Somehow the Rotate function got turned on in the plotter. No idea how because I've tried to avoid pushing buttons on the plotter in the <72 hours it's been out of the box and working... Thanks, Markwq, you're my hero! -
New Graphtec with Corel X3 and Cutting Master 2 - everything rotated 90 degrees from preview...
OWJones replied to OWJones's topic in GraphTec Cutting Plotter Support Requests
I found a Rotate option in the Graphtec settings, is that the one you were referring to? It was set to On, I'll try turning it off and see what happens... -
New Graphtec with Corel X3 and Cutting Master 2 - everything rotated 90 degrees from preview...
OWJones replied to OWJones's topic in GraphTec Cutting Plotter Support Requests
Ok, when I click the question mark button, it changes the dimensions to 197" x 22.15" and now shows a 197" wide strip of vinyl. Where is this "rotate" command located so I can disable it? -
I've got a cabinet, just haven't set it up yet. The stand alone gun works great, but it's very messy without a cabinet, it gets all over you and even wearing a full face shield and a 3M respirator, it's still dangerous. I got a benchtop cabinet from Harbor Freight Tools - it had been $159 but it had a bad gun so they marked it down to only $60 - they always seem to have at least one in their clearance area. I didn't care about the gun, since I already had two - I just wanted the cabinet to contain it all, so it was a steal of a deal for me.
-
That's what I started with - they work great, but only cover a small area at a time - it would take me a few minutes to fully blast an area covered by a 3"x3" stencil - once I upgraded to a larger blaster, I can do the same size stencil in 15-20 seconds instead, and it produces a deeper etch. The air eraser is great for doing freehand work or when you're working in tight spaces, and I'm not planning on getting rid of mine, but if you need to etch a set of 6 or 8 glasses/beer mugs, the bigger blaster (mine was around $25 from Tractor Supply) makes a big difference.
-
The Stick Figure MORE collection from MyVinylDesigner.com has at least one stick figure body in a karate style uniform. You can use coupon code "spring" through June 20 to get 25% off your order. I own both Stick Figure PLUS and Stick FIgure MORE and you'll find just about every stick figure combination you'll ever need between the two. http://www.myvinyldesigner.com/Products/stick-figure-more-download.aspx
-
First "real" cut with my brand spanking new Graphtec CE5000-60 using Corel Draw X3 with Cutting Master 2 plug-in. Also my first time to try and layer more than 2 colors. It didn't come out perfect, but that is entirely my fault - not the Graphtec's. Mirror is one of the el-cheapo ones from Dollar Tree, so I can afford to practice, and if it doesn't turn out, I can toss it in the trash and not lose sleep over it. I almost feel like a professional now!
-
Maybe... I didn't see them until I looked at the picture, they weren't really visible indoors, but daylight sure made them show up. I hit it with a hair dryer and smoothed them out a bit. Never had it do that before, but then I've never pulled the same vinyl off the backing multiple times - the red vinyl was pulled off a liner at least 4 times in the process of getting it layered and installed. That's my story and I'm sticking to it.
-
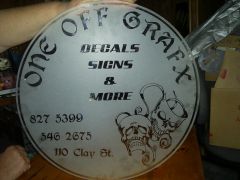
vinyl designs cut by Ottumwa Decal
-
-
 Kelleybell123 - I did a Google search for "inspirational garden stones" and that poem was one of the results I found - I reformatted it and used a different font, and added a different flourish at the bottom and voila...
 -
From the album: Ottumwa Decal
Decal applied to a 12"x12" ceramic tile from Menards. Total cost (to me) as shown is about $2.50. Adding a metal plate holder from Dollar Tree brings the total cost to around $3.50. Expression on Mom's face when I gave it to her? Priceless... -
Why do ship so darn fast!?!?! :-)
OWJones replied to OWJones's topic in Criticism and Complaints about USCutter
You think that is bad? I just got a call from the FedEx guy letting me know he had my packages on his truck and was heading my way and he wanted to know if I was going to be there to sign! I told him that I had spent precious seconds of my time to put a signed note on my door authorizing him to leave the packages... and he had the audacity to ask if I wanted him to hide the packages inside of my garage or other enclosure to protect them from the elements or potential theft. As if I would live somewhere that isn't perfect weather and 100% crime free all the time? Puh-lease! What is this world coming to? Why I remember when I was a youngster, no one had even heard of customer satisfaction and getting anyone to help you was like getting teeth pulled. If we wanted to complain about a package taking too long to show up, we had to hike 6 miles - uphill - each way - in the snow - with no shoes! But these days, with all that new-fangled inter-webs and cellular mobile smartphones and what-nots, you just don't get a decent chance to be disatisfied like you used to! -
Bikers fighting? Guns? Sounds like fun, sign me up! Looks pretty good, too!
-
Awesome looking cut and cool design, too!
-
Use coupon code "spring" for 25% off on all items at myvinyldesigner.com through June 20th...
-
Looking for Camo/Military stick people??
OWJones replied to jtgraphicstudios's topic in Graphic Requests
Until June 20th, 2012, you can receive 25% off of your MyVinylDesigner.com order using coupon code "spring". I used a similar code when I ordered their entire set of stick figure clipart (and that is a LOT of art), plus I recently used this code on their Memorial Day patriotic package. -
I try and make it a point to post a design to my Ottumwa Decal Facebook page every day to show people what I can do, I try to keep them entertaining so that they get shared and work as free, viral advertising. Someone "liked" my page and started downloading and reposting my images - they weren't claiming the work as their own, just posting them as funny pictures. I let it slide until one day he posted a "Privacy Notice" on his Facebook page warning people that they couldn't download his images and "picture art" for their own use. At that point, I posted a politely worded comment pointing out the irony in his warning, especially considering the number of my original images that he had helped himself to. He was very apologetic and went back and used the "share" function to start sharing my images, so that now the images link back to my page and if anyone comments or likes the images, I get the credit and if someone sees something they like, they can click through to me.. I'd give the guy 48-72 hours to clean up his act and get the pictures off of his website. If that doesn't happen, then file a DMCA complaint with his ISP and keep an eye on his website. Also be sure to keep a paper record of any and all communication with him and/or his ISP. If he ever goes back to his old ways, it will be much easier to find a lawyer who is willing to help if you've already got the paper trail ready to go. You might even be able to take him to small claims court, but only after you have notified him and his ISP. Without documentation that you've notified him, he can claim ignorance and say that the pictures came from a friend or something. Certified mail is always a good choice as you have signature proof that your message was delivered. I wouldn't hold my breath while waiting for an apology or a promise to never do it again...
-
 That looks awesome! So far all of my sandblasting has been the opposite of yours, exposing only the letters and images to the blasting and keeping the background clear, but now that I've seen your's, I want to try it your way. I just picked up a sandblast cabinet at Harbor Freight this weekend, but haven't had a chance to set it up. It had been $159, but the only one they had left in stock had a bad gun, so they marked it down to $60 - I already have two guns, so that was a sweet deal for me.
 -
Just basic black vinyl, cut and applied to a $2 12"x12" ceramic tile from Menards. Added a $1 metal plate holder from Dollar Tree (not shown). Total cost to manufacture is around $3.50, not including my time. I'm pretty happy with the way it turned out.

