
sarconastic
-
Content Count
929 -
Joined
-
Last visited
-
Days Won
2
Posts posted by sarconastic
-
-
I don'r race or even compete anymore, getting to old to recover. I'm gonna show my age here, but in the late 80's I got to race against Bob "Hurricane "Hannah in North Carolina, I had won a regional race that somehow qualified me to run this indoor stadium race. I was a pretty decent racer on bigger outdoor tracks, But I didn't know until that race started that I was so outclassed. I should've just left the bike on the trailer and went and watched a kewl race. I was in a heat with Bob and some other bigger national riders that made me look like Podunk boy from the hills .Those guys rode dirty as hell, if you were in the way, two seconds later you were in the dirt.
But I got some really kewl pics with hannah in the pits and with a few other up and comers,like Ricky Johnson, who was in the main, which I didn't make BTW. LOL
Kevin
-
I just cut my image in vinyl. then reverse weed it. I have sand blasted, spray painted and hand painted several designs on Beer mugs, Tumblers and shot glasses this way.
Kevin
-
Bike wins. No contest, no arguments. The only thing quads do better than bikes is they bounce more ( a LOT MORE) when they fall out the back of the truck.
Which is really fun to watch BTW

Kevin
'04 Honda CRF250R, 276 Ice Cube Big Bore Kit, Stage 1 Hot cam, Dynatek programmable CDI, Boysen Quick Shot, Leo Vince Titanium Exhaust. all '07 CRF Suspension and Plastic. I love scary bikes LOL.
-
I have Ghostscript installed and it doesn't work. I have messed with this before and never had a lot of success getting it to work correctly. You spend hours trying to tweak and never seem to get anywhere. Ghostscript is also purported to allow you to thumbnail view eps files in windows, but it works until your reboot or log off and then fails. I will just stick with Flexi from now on. less hassle.
Kevin
-
the simplest way to drive that, and the most reliable would be to remove the end roller, remove the bearings from the end of it and weld a 1/2" solid shaft through the center. Leave several inches out the end and put a pulley on it. Mount to the rails with dodge bearings. they're cheap and will last a life time. I would do the same to the other end just to make sure it stays true and lasts. The bearings in those rollers are not designed to work under pressure for long periods of time and will fail, and be a pain to keep the belt aligned. you can then select pulleys that give you the 6to1. plus you can rig up an alignment adjuster on one side pretty easy. This will make it tons easier to help the belt track.
Here's one I saw that uses a dodge bearing on the end units.. very simple and easy to install. and you can lube it internally with a grease gun. they have built in zerks.
Kevin
-
I have the newest stable release of inkscape 0.47-3 and it still does not support EPS import or open.
It doesn't even view the files in the folders.
Kevin
-
I guess the other thing to consider is, how much do you want to suck up to the local Police. Being the guy that letters their vehicles can get you out of some future situations that you may not foresee. and not just you, your kids too. LOL Sometimes you can adjust your price down for situation where it basically becomes insurance for your family. I have been WARNED a couple of times when it should have been more because of different things I have done for local officers here in town. My teenage son has made a couple of stupid decision in his youth and been given a break because of my relationship with the law.
I have had my band play benefits for them for fund raisers for free, and have just helped a few get jobs in the businesses they run on the side. We're not buddies but it helps to increase the level a little once in a while.
Kevin
-
in that case check out these guys, they have great prices and low setup fees. Ask for a sample pack and you will be impressed by their work.
Kevin
-
Your blade is out too far. I cut heat transfer at 120-130 and don't go through the backing, Getting a blade 1/2 the depth of a credit card is just a starting point, you then have to adjust it to make it and your pressure match up for the stuff your cutting. If it is not cutting through in certain areas, AND your cut strip is flat all the way across, then you do not have enough pressure. When the blades start making corners the force on the blade is increased and will cause the blade to pop up out of the vinyl for a little bit.
When the blade is out too far people tend to drop pressure to prevent it cutting through the backing. When set up correctly you shouldn't have a problem adjusting it to just cut through the vinyl. Keep in mind heat transfer vinyl is much thinner than regular vinyl, so you won't need as much blade sticking out to cut it.
Kevin
-
www.artbrands.com has some pretty good ones, and they have sales all the time.
Kevin
-
the seiki 16" x 16" is one I saw for $250, it is element based not infrared, I have found a few others in that range. The Cheapest I have found an infrared unit was for $310 or so.
I realize Infrared is better, but It will probably be about money for me right now.
Yeah I took the glass out of the unit too LOL.
All I have seen for the dryers so far is the ones I found on youtube, and couple of other sites.. Haven't come across any actual plans for them yet, I mistated and should have said ideas not plans, sorry Mid..
Kevin
-
I agree with Dakota, I would have made it a tad smaller and center more on the door itself not the free space, maybe an inch or so from the door handle recess. I don't care for the look of the company logos on the rear of the cab. I have put additional info there, like a motto, but not the main logo.
Great looking design though man, really sharp work.
Kevin
-
yeah that's a new trend in police cars now, hide until it's too late LOL. Low profile lights, minimal markings and colors that blend in with Joe public's cars.
I would be somewhere around $480 to $550 depending on the difficulty for that application.
Kevin
-
The link to the one Mr300 posted has an external bulk ink system installed which is why it's 199.
Kevin
-
a small word of advice, if your just planning on making a couple truck decal and maybe lettering your trailers, you may want to rethink buying a cutter, unless your planning on a lot more cutting. The cutter itself is relatively cheap, but by the time you add in all your supplies you will probably spend more than if you find someone doing this out of their basement in your area and have them do it. You could probably get your entire rig done for around 4-500 bucks. Less if you get it RTA. your going to spend more than that by the time you get the supplies you need to make your signs.
Not trying to discourage anyone from buying a cutter, but there is a lot more involved than just a cutter.
You need the vinyl $22 per 3 rolls wh.bl,& red say $66 ( multiple colors), the application tape $80 (24" roll for doing larger decal like your truck sides), squeegees $7, cleaners$5, weeding tools of some sort $7 and of course a cutter, 24" minimum. Cheapest here is $329, application fluid $12(trust me you'll need it.)
So your up to $506, now given you can make more decals after your initial set now, and you could add a heat press and do shirts too. Just pick up some heat transfer vinyl.
Just trying to show the whole picture. I was in Construction for myself for quite a while and know how tight the money gets at times.
Kevin
-
I have used SBE, and still do occasionally, but have tried CorelDraw with signcut, Illustrator with signcut, but finally invested in Flexisign Pro 8.1, By far it works the best and easiest of all the ones I tried.
the learning curve is much less than with Corel or illy and it can't even be compared to Signblazer, It's like a Porsch next to VW rabbit. Both get you there, but with not quite the same experience.
Kevin
-
I didn't order the trough spreader from gm, I almost did, I found it at another supplier for a cuple bucks cheaper, and it came with a cover to put on it between coats. Midweest posted the link to them earlier, they are where I am going to get the union inks etc from, Valleylitho was the place.
I am going to have to wait a few weeks to get the rest of my supplies though. Was walking behind my car today and realized I had forgotten to renew my tags on it, from Nov LOL. anyway, with penalties it lower my balance quite a lot.
It just gives me more time to build a screen rack/ drying cab. and a few other misc supplies I will need. The more I learn about this the more I find I need to get it done.
I think I will probably have to break down and buy that $250 flash dryer unit, I just can't find anything home built that I like. I don't have room for a belt dryer right now, and don't want a big oven in there either, I am too lazy for that kind of wiring work right now. I will probably built a small belt dryer eventually though. I saw a couple of pretty kewl plans for them. and I have a few parts laying around like the gear reduction unit etc.
I'll keep the updates on here as they progress though.
Kevin
-
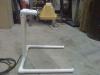
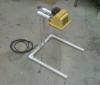
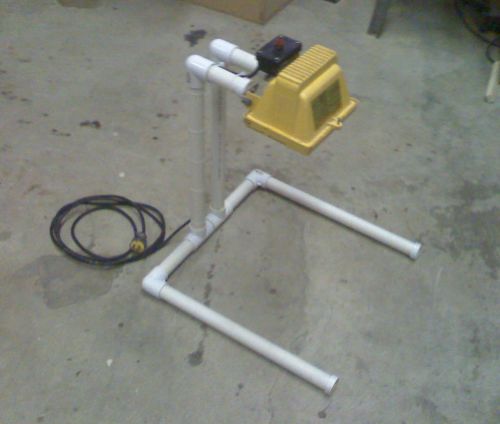
I built this unit today, I already had the light and spent $10 on pvc and fitting. Is actually a lot sturdier than i thought it would be. It should get me by until i need to upgrade.
Kevin


-
msd is on there, http://www.brandsoftheworld.com/search/120188543/73604.html
So is American Racer http://www.brandsoftheworld.com/search/120188597/73720.html
donon about the other two. Just have to try different searches to findem.
Kevin
-
nope, I haven't heard anything yet. Hopefully they will soon, they don't always get in a great big hurry but they usually get back to you.
If I do I will be sure to share.
Kevin
-
Thanks Mid,
I finally have a use for that old wet suit I grew out of, but wouldn't let the wife throw away. Kewl.
on my heat press the t-square wouldn't work real well, The silicone pad just floats on my platen. so i don't always have a true edge to go from. I just use a tape measure or Eyeball it for most applications.
Kevin
-
I have not used the Greenstar vinyl, but I can tell you to avoid cheap vinyl, you will save your self tons of troubles. By good name brand quality vinyl, it weeds easier, Applies easier, and has longer durability. Oracal is what I use, other good brands include FDC, Avery(depends on who you talk to), 3m, and several others.
Your better off spending $50 - 75 on two or 3 good rolls of vinyl that you will use than $150 on 12 rolls you probably won't. I made the mistake of thinking I would waste a tons of vinyl learning how things work, you don't really waste that much, unless you trying to cut 8' banners on your first try, which wouldn't be real bright anyway :-)
If I were you I would get Some White, Black and whatever colors you need for that stock car in 10yd rolls of Oracal 651, then you will be able to do signs with the white and black too. 10 yds isn't that much believe me.
Kevin
-
If I get a chance tonight I will do a video of the off contact adjustment on the press. By making the clamp tilt with the turnbuckle, and having the arm height adjustment bolt under the arm. off contact is almost dead nuts every time, and very fast to adjust. I was worried originally about the play having wood arms, but it has turned out to be moot for the most part. The arms themselves are only 8" long, so there isn't a lot of room for movement. and the Spring and turnbuckle tension adjuster hold the arms back towards the spinning assy so there is almost zero play. I also think since I used MDF for the Rotating assy, with the precision bearings, it removed a lot of play that would otherwise be there from regular plywood like the plans call for.
I did a dozen or so cycles rotating and dropping into position and raising with a frame I had in my shop, It was an old cabinet front I had made but not finished and it was 24w x 28T and it repeated dead nuts every cycle. Still a good idea taping the paint stick to the end of the screen though, then I wouldn't have to worry at all. Thanks for that.
Oh BTW, I placed my order on the frames last night from GM. They called this morning to apologize to me, they had put in a 10% off on all frames, but it hadn't updated on the website yet, so they changed my order to reflect the new price. so I got the 20" x 24" 110 mesh alum frames for $12.59 each. and $16.25 for the 155 mesh frames.
Yeah I saw Ryonets micro clamps. $109 per arm? Yeah right lol. Welder and me, $25 for all of them lol.
I am going to put the list together today for the supplies I am going to order, I will post it on here and let you review it, to make sure I got everything I need. Thanks for the help.
I am sure once I get into this I will feel overwhelmed, but that's normal for me, dive in head first them figure out to swim in it.
I was looking at pallet adhesive ont eh site you gave me, and there are several kinds, Some require flash dryers to work right others don't say one way or another. Which were you recommending?
Kevin
-
Yeah I had read about the spray adhesive mess, I am putting together an order for the basics I need tonight. I just wanted to get it completed before I committed. :-)
What's wild about building these is every time I got a piece done I ripped it off, and decided I could do it better. I have already decided I am going to make the arm alignment brackets over. I am going to add screws to it to adjust left to right and keep the tension better. Just in the building process, the wood arms have worn a small amount to allow left to right play. It's only about 1/64" but it bugs me.
Just adding the tilt to the clamps made a huge amount of difference in how hard it was to set the off contact height. I was trying to figure out how to do it with the platen, and this was a heck of a lot less trouble. it gives me a couple inches of adjustment. Which should allow me enough room to figure out a hat platen.
Kevin


I started the homemade screen press
in T-Shirts and/ or Garments
Posted
That's teh same way i do, I think about, listen, ask a few question, and usually by the time I start I have a good Idea of what I am going to do.
For the end roller you might be better off looking fo some tubes that are the width of your rails. I usually wander around farm stores, like orshelins or Tractor supply, and find stuff I can make work for the application I am looking for. another alternative could be found at a farm store. they make weld in hubs that are made for the center of a pulley. they have the set screws that lock them to the shaft. you should be able to find them for about $6-7 each. once you see them you'll understand what I am talking about.
Check out this page, it gives you an idea what you can do. I use this supplier a lot for supplies at work.
http://www.mcmaster.com/#conveyor-belt-tensioners/=5odprd
Kevin