

jmas
-
Content Count
201 -
Joined
-
Last visited
-
Days Won
8
Posts posted by jmas
-
-
-
They don't say anything on them do they? They're just blank? I'll take one if so.
-
Do you still have these? I need one for a CE6000-60.
-
You framed it sideways!
-
Might also be a way for people with Ebay Bucks to convert it into something more useful.
-
I think Times New Roman for the regular text. That goofy "e" is a TNR pet peeve of mine.
-
have I been wrong this whole time ??Im pretty sure ive been seeing add length and width then divide it in half
to get the pricing ...
did I just misunderstand or is that on just smaller decals...
if so at what size did calculation change??
id like to have it so in my head I can give an estimate as it seems around here price is first thing they ask
Ok, don't listen too much to me, I don't do retail sales or pricing the same as most people, but if there's one thing I know, it's that there is no single pricing method that works for everything.
I do H+W/2 when I make a decal and give it to someone. Install and design costs more. Intricate designs cost more. Different materials cost more. Layering costs more. And even then, if I look at it and dread doing it, it costs more. If it's super simple for someone I like, maybe less. If I'm making a lot of decals, I may adjust it up or down. I did some 1x3 decals which should cost $2 each but they were 2 color and I was doing 10 of them. I thought $40 sounded better.
At a certain size, H+W/2 breaks down. I'm doing a 6in by 200in lettering job soon and H+W/2 would be $103. I'd do it for that, but the install will be hard so that's more. And if it were 24 inches tall, it would be 4 times as complicated, but with H+W/2 the price would only be $112. I wouldn't do 24x200 for that. I also do some 1x1 decals on a repetitive basis and I charge $5 each for them. They are paying for my time and for the fact that I have all the designs they need, about 30, ready to make at a moment's notice.
I don't have any advice, just showing you how H+W/2 sometimes works and sometimes doesn't.
-
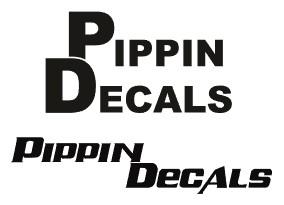
I like the ones posted but having the luxury of sitting here and looking at them (instead of making one of my own because I'm terrible at things like this) I have a couple suggestions. On the first, separate the P and D by cutting the stem of the P to match the curve of the D. On the second, separate the N and D and make the first letters larger. Maybe it's just me, but I don't like big thick letters touching. And I'm sure no one would notice it but there are 3 identical Ps almost in a row so making the first one larger helps break that up.
-
 3
3
-
-
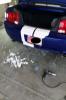
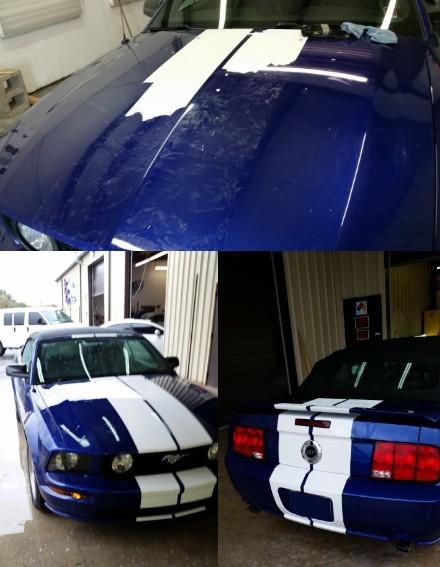
If it were me and i have done it ,Is i use a digital heat gun on low setting and ive just peeled away the vinyl.Then i actually use wd40 on the residue left over and wipe it off with a non scratch cloth,then come back with Rapid prep for the cleanup for new install.Works perfect for me with no issues. Ive tried the eraser wheels etc and didnt like the outcome .....But that looks really good . nice job..That's my preferred method but it wasn't happening, the vinyl was super dried and cracked. The car was an '05 and it must have been factory vinyl or applied soon after. The pile of white stuff on the ground is the few inches of vinyl from the bumper. I'd peel half and inch and it would break. And the bumpers were the easiest panel to do!
Working at a body shop, I'm used to using eraser wheels and they work well for me. But not the disc types, the wide paddle wheel erasers are the only ones I'll use.

-
1
-
-
What R-tape did you use? I've only used wrap vinyl for a few small things and I loved it so much that I've considered using it for a lot of vehicle stuff that I'd normally use 751 for.
I made myself a small decal out of 3M carbon fiber wrap recently and could not get app tape to stick to it at all, but that's probably because it was carbon fiber and not regular wrap vinyl. Also, if you think white is hard to weed because you can't see the lines, try carbon fiber!
-
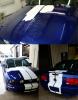
Well, I finally got time to do it and it turned out ok but I think I'll use wrap vinyl next time. I was a little upset to find out that the place I work doesn't have an eraser wheel and spent two hours trying to get the hood stripe off. That's the first pic. Luckily I borrowed an eraser wheel and zipped the rest off in 10 minutes.
-
2
-
-
Thanks. The guy didn't show up today, thank goodness, but those measurements are pretty much what I needed. Hood=104 inch, roof=74, trunk=74. Those 3 alone are 252 inches, leaving me around 24 inches to do both bumpers. It wouldn't have been enough.Ya know, if I was a smart man, I might have noticed that 104 inches seemed pretty darn long for a Mustang hood. I got the car in today and
A: contrary to the boss's opinion, it is a convertible, so I don't have to do the roof after all and
B: all the measurements are half what the webpage said. They obviously add both stripes together. I should have noticed that but, hey, at least I have plenty of vinyl.
-
2
-
-
Thanks. The guy didn't show up today, thank goodness, but those measurements are pretty much what I needed. Hood=104 inch, roof=74, trunk=74. Those 3 alone are 252 inches, leaving me around 24 inches to do both bumpers. It wouldn't have been enough.
-
Does anyone happen to know how much vinyl this would take?
http://www.stangmods.com/Vinyl-10-Dual-Racing-Stripes-05-09-Mustang-p/5115.htm
I work at a body shop and my cutter is at home. I usually pre-measure things, make them at home and bring them to work to install and I always have plenty of lead time, usually a week. Without even talking to me, my boss scheduled a guy to bring his mustang to have the racing stripes redone tomorrow. I didn't even get to see the car and don't know what the stripes are like except that they're two wide stripes and it's hood, roof, deck lid, spoiler and both bumpers.
I have knifeless tape and roughly 23 feet of 24 inch wide 751 and I'm wondering if that's going to work.
-
Well, I didn't get to install them yesterday, other people were working in the way. The place is still under construction although the building itself is mostly done. I go to work there in two weeks to help get it ready to open so I'll install them sooner or later.
-
I've found it hard even on a Graphtec, but it's not the machine's fault. If your registration marks are off by a hair, the last decals might not line up.
Here is an example. Take a 24 inch high example of layered decals.

Rotate the yellow design by 0.1 degree and line up the reg marks. It's slightly off but once they're cut and you're lining them up through app tape, you wouldn't notice that. I certainly can't see or do any better except by luck. The first image lines up perfectly.

By the time you get to the end of a 24 inch design, they don't line up anymore.

It usually works on a 24 inch decal where the outline is larger, but for a bunch of small decals, a small difference can throw them off over a long run. Instead of making a long run of 10-15 at once, try two runs of 5-7. I've found that they're still pretty well aligned at the 12 inch halfway point.
-
1
-
-
Any tips on separating it from the backing? I got HT55 app tape as recommended but it still barely sticks to the app tape. I only tried with a couple small test decals and I guess I can manage, but, man, it's going to be a pain in the butt. I was thinking about running a heat gun over it before pulling the backing off, but I'm not sure if that will help or hurt.
Anyway, tomorrow's the day. If I don't see any tips, I'll struggle through it. I'll post pics if I don't get mad and throw them in the trash lol
-
Thanks! I thought applying it outside would look best anyway and I think AT75 is what I have at home. It sounds like I'll be good to go.
I'm looking forward to using it and I think this is going to be my favorite vinyl job so far.
-
I need to make 5 2x2ft frosted glass decals for the company I'm getting ready to work for. They're not very intricate, just a 2ft ring, inside that is the company's name going around in a circle, another ring, and "25 years" in the center of everything. This is a business with a large glass front but it's covered and will probably never get wet but the exterior will be open to temperature changes.
I've never worked with frosted glass vinyl and I'll be ordering it tonight, I just wanted to ask before I ordered...
Does anyone recommend anything other than ORACAL 8810? I haven't looked up all the brands, that's just all I saw on uscutter. I'll probably get that unless anyone recommends a different brand.
Do you put it on the outside of the glass or inside? Again, the glass is covered and probably always in the shade.
Will wet install work? I usually prefer wet on large decals.
Does regular transfer tape work fine? I'm not exactly sure what transfer tape I have, it's at home and I'm at work, but I think it's Rtape high tack paper. I also have a low tack clear tape, but I'm sure that's no good for frosted vinyl.
I guess the good thing is that I'll be working there soon so if I screw it up I can just replace it.
I think that's it. Any input before I order tonight is appreciated. Thanks!
-
Open Sans for Auto CentreYep, Extra Bold
-
Serif is usually easier to read in long blocks of continuous text, but sans is usually preferred for small chunks and smaller physically sized text, both of which fit here. And with random capitalization, the cleaner the letters, the better.

-
1
-
-
To print to pdf, it can't be larger than a page of paper. In Graphtec Studio, resize the drawing area to 8.5 inches width and 11 inches height. Now your drawing area should be the same as what will go into the pdf. Resize your graphic to fit within the drawing area and it should work.
-
Not sure if this is close but I made it recently and never used it. I'm having trouble converting it and getting it below 1mb, but you should be able to get a trace from this.
-
What is it made out of? Seems like painting would require some prep work anyway. I don't understand what he thinks he's saving.
Is it meant to be permanent? I assume it is, but if it's advertising an event that takes place next month, that's different.


Big vinyl job
in Business Practices, Sales and Pricing, etc.
Posted
I'm making some simple but large signs. Customer is supplying metal substrate, I'm cutting and applying vinyl (751), then they're installing the sign. I have my installation price, don't worry about that, and I have a price in mind for the vinyl, but I need a second opinion. The vinyl is just text, big fat extra bold text so design and weeding is negligible, cutting and masking is the main thing. The text has a white outline so all the measurements will basically be double.
One text is 270 inches wide x 15 inches high letters. The other text is 5 groups of text with 18 inches tall letters. Widths are 72, 90, 168, 189 and 201 inches. Added together, that's 720 inches in width.
So, big fat letters that are 270x15 inches, 720x18 inches, and x2 on everything for the outline.
Let's see how far off I am lol