
sarconastic
-
Content Count
929 -
Joined
-
Last visited
-
Days Won
2
Posts posted by sarconastic
-
-
-
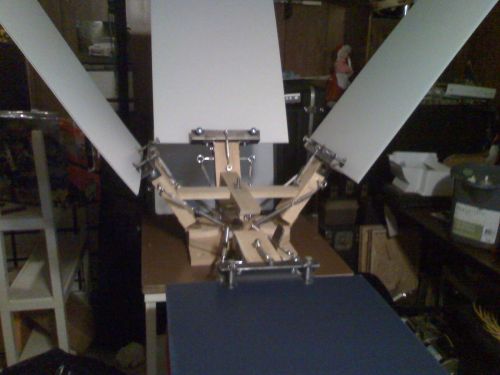
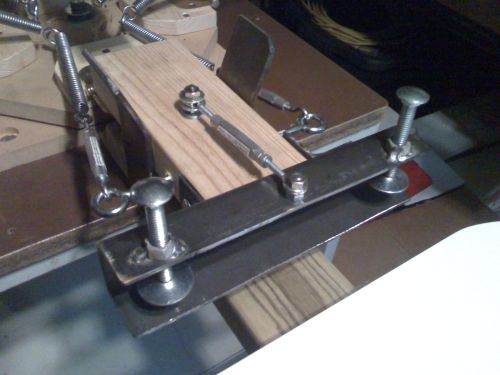
I got it 99% done, at least for this stage. I redesigned the clamps, so they are stronger and made it adjustable as far as tilting to help with adjusting off contact. This way should make is easier to set on thick to thin items. There is Bottom screw that is adjustable to set the arms' height, then a turn buckle that will re-level the screen to the platen. I also made the bracket that hold the clamp with slots so i can tweak each clamp right to left in case the wood arm or the platen arm would happen to warp a little bit. I figure for a starter press it should be ok. Later I will build steel arms, and add micros to the ends of those.
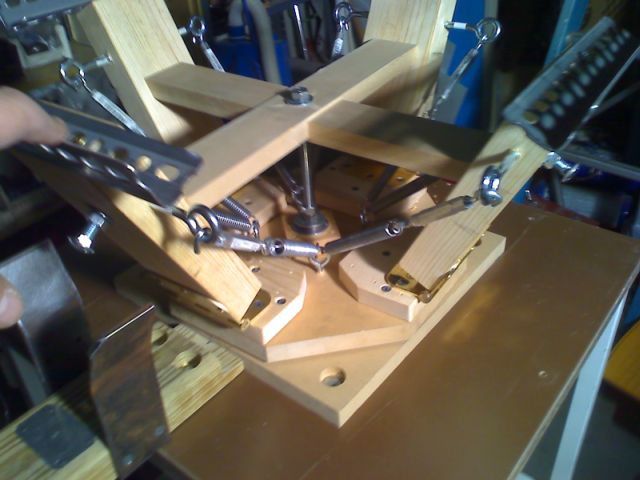
Here are some crappy camera phone pics of the finished products. I don't have my screens yet so I mounted some coro in the arms to get an idea what it will need for space. It takes a lot less room than I anticipated. I think I may have the arms at a little too steep of an angle, so I will have to adjust that down. Now just gotta spend a bunch of money to see if I want to do this or not LOL.
Thanks everyone for your input. THis was kind of fun to build. Now I can try the Vinyl on a screen to print if I want lol.
Kevin


-
MIdwaste,
sorry I didn't reply to your post directly last night, I was whipped by the time I got the stupid pictures the right size to post. LOL
You reccomended Union Ultra soft inks. One Question I had was the difference between inks. I was thinking water based would be better for me, thinking water based clean up would be better than too many chemicals, but then I read a little bit, Now I am confused. Some inks require a catalyst , and you then have a limited shelf life and you have to pitch them. other you scrape right back off the screen and put back. I have watched more video tutorials int eh last week than I care to remember, all of them use a different process. Same goes for emulsions? are there emulsion that don't have to have the two part catalyst. If I am only doing a couple screens I wouldn't think I would need a whole pint of it.
gm grapghics are by far the best prices on screens, and their 20x24" 110 mesh are on sale right now for $14 for the aluminum. I am going to order 4 of those today.
I was planning on using the 500 what halogen to burn the screens., I saw pretty kewl stand made from PVC that gave me a few Ideas. Also I am going to try and print on my Laser to start, I am a little concerned with the opacity of my laser units, so i will have to experiment a little. If it doesn't work right I will probably pick up an epson 1100 for it.
Haven't figured out the best way to dry yet. I have the heat press that I have heard some use, but the time is pretty long on it. my main thing is to get the press completed and try it out with minimal supplies and see if I even want to do it. I just think it will add another thing I can do in the winter months when things slow down a bit.
Thanks for the input.
Kevin
-
do a search of the forums for silhouette, there are a couple threads where some of us tried this with varying results. It lists the steps we took.
Kevin
-
That's what I was thinking. I am not doing anything until I have the facts, and a written release/auth from all parties involved.
Kevin
-
My Sister in Law brought me the tag out of a Firefighters coat, They are wanting me to add the fire department logo to them. But I am not sure if i can heat press on it or what I have to use, since it's a fire coat. I figured vinyl would just melt in a fire.
My screen press isn't done yet so that's not an option, but even if it was i still don't know what to use for graphics on them. The tag say Class III Photometric performace level 2 100% polyester and says do not Iron.
ANy ideas for me on this?
Kevin
-
one of SBE's weaknesses is the display quality stinks, try sending it to your plotter but use a pen and a piece of paper in it to see if it's the image itself or the quality of the sbe display.
Kevin
-
that is the simplest symbol to make ever. just create a circle, then a smaller circle in a different color adjust it to the thickness of outer circle you want.Select both circle. Use the weld cutout function of your software to remove the center. then create a rectangle the same width as your circle and the same width as your outer line, and rotate it ti 45 degrees, place it over your circle. select the circle and the rectangle and weld them together. wallah you not have the NO symbol.
Kevin
-
FlexiSign Pro version 8.1 will vectorize 99% of stuff better than inkscape with a heck of lot less points. especially colored items. I have done 7 colors images in flexi that would have been a nightmare in inkscape. John's right that inkscape does work ok when you have a crappy low res image that is single color.
Try that in inkscape.
I tried coreldraw X3 and X4 but i didn't care for them as much, not just as simple as vectorizing, but the fact that everything was so diffe3rent from all the other software I had used.
Kevin
-
on our race team we had a guy who was a sign painter, he did the lettering on the car for us as well as working in the pits with us. We couldn't find any big sponsors that would pay for the truck and hood. So one drunken night in teh shop, we were finishing off the last of 2 24 packs of busch light, when Dave started getting out his paint and brushes,and said he was painting the trunk. He did the busch mountain scene across the entire trunk lid. A week or so later through the grape vine, the local bottler heard about the lid, dropped by and was impressed. He gave us $1000 sponsorship money. and a deal that paid us if placed top 5. And also 4 24 packs of bush light a week. We had a little card that we showed at the store, for free beer.
It was pretty kewl. The money was nice, but the beer cut our racing budget in half LOL.
Kevin
-
For this hole project so far I have spend only about $30 in hardware. Some of it I had laying around, and some I pick up at various locals shops. Thew biggest problem i had was finding 8 of anything for the springs and adjusters. everyone had either 6 or less. so i had to make a few trips around. And on the springs, i had 2 that were a little shorter than the other 6, but heavier gauge wire to comp for it. I just had to adjust that one a little different. I figure when I am done I might have $50 in the press itself.


-
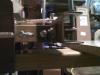
I finally got some pics of the press for your eyes. I have already found a few things I have to upgrade. The angle Iron I used on the arms isn't strong enough. it flexes way to much. It was something i had on hand and just gave it a try. I am having some 2" x 3" square tubing cut and I will make it a channel and mount my screws to it. much stronger and i think i can weld up a neat little micro system for it, just gotta figure it out in my head.
I went ahead with the wood arms, I planed them to fit in the alignment bracket just perfect so repeatability should be ok for a while. The wood arms are only 8" long so the warping and twisting I was worried about isn't a big deal.
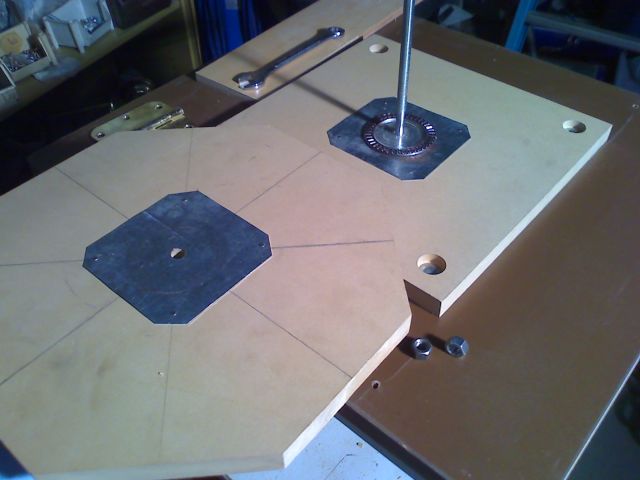
I am however going to make a steel platen mounting arm. there are just too many variable with the wood arm. The board I used is very straight for wood, but still had a minute twist in I didn't see. I will make platen alignment a bear. I am going to try and get some pics of a standard commercial version and duplicate it as near as possible, that way i can add the platen height adjustment under the platens.
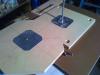
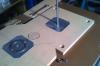
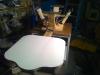
I made my first platen out of an old White board I had laying around. it should work pretty good.
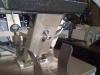
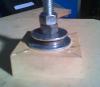
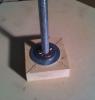
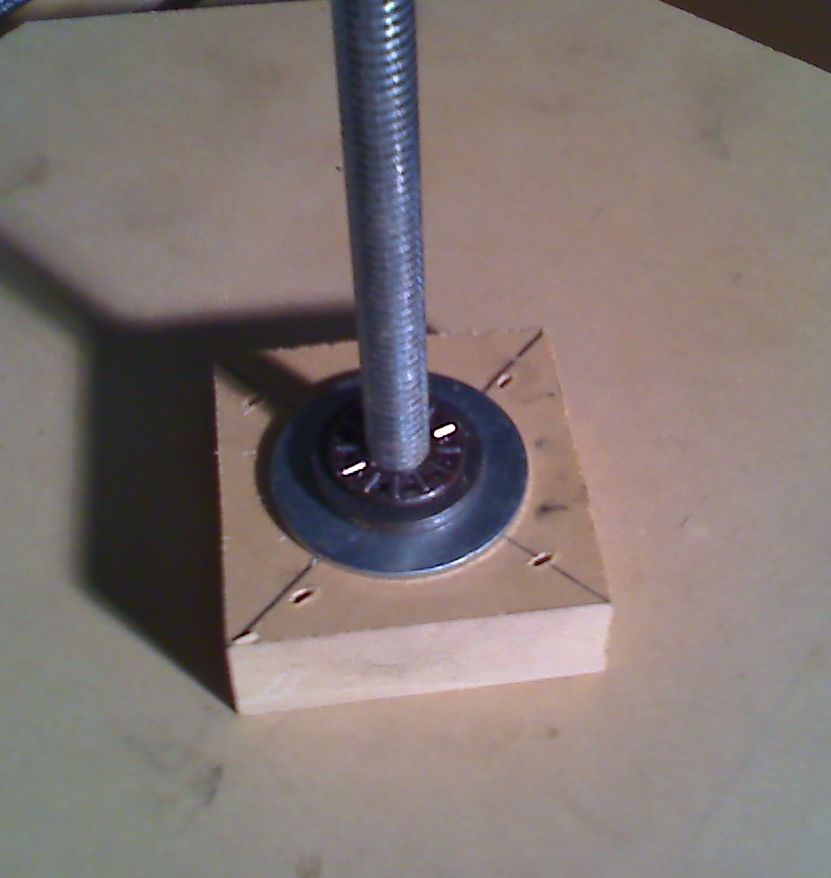
these show how I made the bearing using the flat bearings I have. I used 16 guage galvanized sheet steel to make a smooth surface for the bearing ride on so it wouldn't wear in to the wood. just drilled holes int eh corners and brad nails them in place.The top bearing is from an old stretch wrap tensioner. I needed a spacer to align the bearing in the center of the carriage bolt i used as a center, so i found a hole saw the right size and cut it out of 1/16" lexan then drilled the center hoel the right size. It works great, you can set the tension with the lower nut and lock it in with the double nut. This is way more precise than the lazy susan and I have 8 or 10 more to replace them if I have to.
Ir rotates very smooth and precise, you can adjust it to freewheel or so it has a bit of tension so it will only go so far when you flip the arms around.
The center up stops i made adjustable too by putting them on the bolt. In the evenet I need to use a larger screen I can raise or lower it to prevent interference.
I also added adjustable stops on each arm, underneath, not sure if this is going to be needed, but it seems like a good idea. I did this before I decided on changing the platen arm to allow for more adjustment for off contact.
I will post ore after I finish a few more things. I was going to work on it today, but I had a show with my band last night and I haven't quite recovered yet


-
That is a conundrum for all non-pro people. It might take us 2-3 hours to design something, but we can't charge for our ineptitude. Someone who has been doing it for a long time and everyday will only take about 30 minutes. So for most design stuff, I just make it a flat $45 design fee.
I took a 4 week break from before Christmas till a couple weeks ago. I didn't design that whole time. I got a decal job last week and it took me 2 hours to do the design work, when before It only took me 30-45 minutes. I spent most of my time trying to remember where the tools were to do what I wanted. Now a week later, I am back up to my normal speed.
Kevin
-
if your webhost supplier has ftp access you can just use an ftp program to backup what ever you want to it. just create a folder on your site and upload what files you want to backup up. But keep in mind, unless you have the ability to set permissions for individual files and folders on your site, this could put your files out to the public.
there are free FTP program out there like Filezilla FTP. they work really well for this.
Kevin
-
LMAO, I sent that around to everyone in the office.
Kevin
-
FORUM ALERT!!!!!!
The bosses will be out of the office due to inclement weather.
Emergency preparedness plan Beta Phi will now be implemented.
1.All Members with less than 50 posts are required to bring one 6 pack of Beer errr....... Beta to the designated Assembly point. Be creative, pick a beta with flavor.
2.Members from 50 to 100 posts must bring one large specialty Phi (Pizza), Convenience store Phi is not acceptable.
3.Those members with 100 - 250 must bring a large Single topping, Or Cheesy bread sticks. Cinnamon sticks are an acceptable alternative.
4. Those with over 250 will be designated hard liquor only, because you obviously need it, you spend way to much time on here.
 2 bottle minimum.
5. If your a 1000+ poster, we will have counselors on hand to deal with your special needs. The counselors office has been stocked with a full bar and 3 mini fridge beta keg holders with taps in various flavors. Restraints are not mandatory but will be implemented if necessary.
Pass this plan along to everyone who is NOT in charge here, they can't know of the Beta Phi EP. It is of the utmost importance that BannerJohn NOT find out of our plans. He would dig though 40 foot drifts to come.. ;-)
Kevin
-
I went to pick up an order one time and the supplier used the method I explained. It made sense when I saw it. It also makes it handy, if someone want a couple of large signs I can go look at a glance and see if I have enough vinyl on hand to do it, or if I have to order. This helps me tell them what kind of time frame they are looking at.
Kevin
-
I did a couple cars this year, and total I would guess about the same amount of vinyl you used. I got $250 for one and $300 for the other. but around here, racers are poor SOB's They stop looking for sponsors as soon as they get a beer sponsors that give them free beer.
They gripe if the vinyl is over $300, but I have seen them pay $1000 for a wrap. go figure.LOL
Kevin
-
I just saw the Epson R1400 at a local Nebraska furniture mart for $265, those are great for transfers. They make a bulk ink system for them for $100 too.
Kevin
-
I don't have illy anymore but the process your looking for is called Welding. It takes all the same colors that are touching and bonds them as one with no cut lines in between.
In illy I believe I used to use the pathfinder tool, and may UNITE? not for sure though, it's been a while.
Kevin
-
I had a crash that luckily I was able to recover from. But it opened my eyes. I now have a RAID5 3 disk array in my computer, each drives mirrors 1/3 of the drive to the other two drives, if one crashes, teh other two can carry on until you replace the third. Then I have An external HD That mirrors the main array. I then back it all up to my server HD to make sure it's there.
I back up every day twice a day, once at noon and once at midnight. You wouldn't' think you'd need to but if you spend 4 hours on a design for someone and your pc crashes. Your scrooged. Better safe than sorry.
I also now have a backup PC setup that has all my cut and design software installed. I can unplug my main pc and plug this one it, and I am ready to cut.
Kevin
-
I am basing it loosely on this site, but I am making improvements to it.
The lazy susan I made is much more precise and durable than the one you can buy. It's also tension adjustable, so you can tighten it up as things wear in or loosen it if it's too tight. The company I work for does contract work for NSK Bearings and they gave us some out of spec flat roller bearings that are about 3" in diameter but only 3/32 thick, and have a load capacity of hundreds of pounds. I just built the rotisserie out of those. I haven't built the arms yet, but am considering making my arms out of steel instead of wood. then I could do more with location of the screens.
I already had a metal stand with a wood top to mount it to, so I have just had to work from there up. The main part I don't like about these plans is the 2x4 they use to mount the shirt platen on. It doesn't allow for any adjustment for alignment. I was thinking I should try to copy another manufacturers arm then I could buy their platens to mount on it.
What would you recommend I get for start up supplies? Remember I am doing this in my basement. I would liek to be able to do 2 color shirts to start with then more at time and money allows. Also what inks etc that require the least amount of chemical cleanup etc. I have found starter kits for $400 or so but it looks like they have a lot of crap I won't need, at least right now. I'd like to get into it for between $100-$200 with a couple screens Squeegees, trough , A few colors of inks, and the cleaning supplies. I have a wash out sink I will put in there , I do need to make a light table for flashing the designs on, but that won't be a problem.
Also what mesh screens should i get, and what inks for them. Most prints I will be doing will be 1-3 colors, Some with fine detail, but not planning on any gradient stuff yet, it's out of my league. I do want to be able to do some Choro signs too, and maybe some small posters as well.
I'm going to use my heat press for drying right now until i can come up with something better.
Any other tips would be helpful. Just like the cutter, I am diving in head first to see if I can get my feet wet. LOL
Kevin
-
I was in my work shop the other day after looking at the plans online about how to make your own 4 color 1 station press. I guess I got the bug, I started it today, I will post a few pics when I get some more of it done. I couldn't find a lazy susan like the plans called for so i had to build one out of some plates and a flat roller bearing I had laying around.
Now I need a supplier for cheap screens and the rest of the materials. I should have the press done next week if i have to time to work on it. I am contemplating adding micro-registration to the heads, but not sure if I will need it.
I figured I would build the wood version first then, after I use it a while I will build a steel version, this way i know what I need to do differently.
Kevin
-
I just sent and email this afternoon to 3m requesting info on what material to use to make those protectors. Do you know of any others that might supply it. THey want $12 apiece for them around here.
Kevin


racing season is right around the corner!!!!
in General Help
Posted
www.brandsoftheworld.com
Kevin