

stokedgraphics
-
Content Count
56 -
Joined
-
Last visited
Everything posted by stokedgraphics
-
Just got the 6 in 1 heat press, um caps are supposed to fit?
stokedgraphics posted a topic in 6 in 1 Combo Heat Press Discussion or Support
I added this to my equipment hoping to offer heat pressed caps. When I opened the unit and set it up I went through all of the configurations and tested each one. Everything seems to be fine, but the caps I have don't fit very well in the cap press. It fits great for pressing on the bill, but on the crown I can't see how it's supposed to fit if the curvature is different. Am I missing something or is this just not the way to go for the caps. I've compared it to some other hat presses and it looks pretty much the same. Should I order different caps? I'll be purchasing a sublimation printer in the next few months, so I haven't done any mugs or plates with that yet. Also, I saw it mentioned somewhere on here that the temp read out is in Fahrenheit? It shows Celsius on the panel. Thanks in advance to anyone who answers. -
Haven't been able to find any comments whatsoever about this, so I'm opening it up to discussion before I try it. I've been screen printing for a lot of years, but I often get orders for just a few shirts and it's not worth the time and effort to make a screen and deal with the clean up afterward for such a little job. My question is, has anyone tried to airbrush onto something like EasyWeed or ThermoFlex Plus? Since the airbrush paint has to be heat set anyway, I was thinking about being able to do shadowing and special effects on multi-layered vinyl. This would open up a whole new avenue for me, but again, I was hoping for some feedback before trying it. Thanks in advance for any info! WE'RE STOKED! On Graphics!
-
Combining airbrush with heat press vinyl?
stokedgraphics replied to stokedgraphics's topic in Other Materials
I'd completely forgotten about this post. Airbrushing on heatpress vinyl looks great! ...until you wash it. Unfortunately, I had little success in trying this. There isn't much that can protect the paint/ink once it's on the vinyl. I'm sure there's a clear vinyl that can be added as a protective layer, but I didn't go that far. In other words, it really wasn't worth the effort, unless the shirt is going to be used for display only; in which case, it's better to just airbrush straight onto the shirt. -
Thanks for posting! I just received my samples! I got reflective and printable vinyl. Now, is there a good way to cut down the rolls to a size I can use? I've got a chop saw, but no clue what type of blade to use...
-
I don't think I've ever posted any of my work in the forum since I joined, so I dug up some pics, albeit not very good ones, to post and get some feedback on. Most of the pics are pretty big, so I'll have to post them in a bunch of comments. It's easier than going through each to resize. Your comments are welcome! The jeans are my youngest daughter's. This was the very first heat press vinyl I'd ever cut, so it was very experimental for me. The Rockin' Boot is a product that I made with a friend of mine and the vinyl was my first paying gig... one month after receiving it. Hard to see, but it's a rocking "boot", a high chair, and a desk all in one. Pretty cool. We've sold about 15 of them.
-
Did you ever get an answer? I had this problem with the same cutter. Once I upgraded the memory and set up SignCut to do step cutting, no more problems. Aside from that, the only real static problem I've faced has been due to Siser EasyWeed heat press vinyl. Solution to static (only one that's worked) is to keep a dryer sheet near by. Always keep the machine OFF while loading any material. Wipe down all surfaces of the cutter before loading. If possible, cut what you need from the roll, if not, wipe the roll before loading. Make slower cuts and again, use "step cutting" in signcut. Not sure what it would be in any other software. Static killed the Z Chip in the first 3 months (winter) I had the machine.
-
A little over one year ago I found the MH-871 on ebay and couldn't believe the price. After spending about 3 weeks researching and asking questions about this machine, I bought one hoping the slams against it were wrong. Less than a year after buying this cutter (and dealing with the myriad little issues) this machine has paid for itself at least 8 times over. Since starting with heat press and adhesive vinyl, we've had countless shirt/clothing orders and expanded to include vehicle graphics and storefront signage and lettering. We've almost begun to outgrow this simple machine, so I wanted to document some of the issues and solutions I've come across with my cutter. 1. Static is a big problem and even knocked out the "z" chip (the control chip that raises the blade in between cuts) early on. Solution: Keep a dryer sheet (bounce sheet) near the machine and wipe down (lightly) the surface of the vinyl and all of the contact surfaces of the cutter. Don't know who posted that one here, but it's a life saver! 2. Different materials give different results. Solution: As for heat press vinyl, I've tried many mfr's. and found that ThermoFlex Plus is the easiest to weed and apply and has the best performance for multi-layered vinyl. On adhesives, I've had excellent results with Oracal, 3M, and even the Greenstar that US Cutter sells. Overall in this case, it's true that you get what you pay for. 3. Read, read, READ! The folks on the forums are an excellent source of information, but like many forums, too many people forget to search THOROUGHLY through the forum to find answers. Even the most patient of forum members show their frustration at answering the same questions so many times. Watch the videos that are available and take time to find the info you need before posting a new thread with an old question. 4. It's probably operator headspace and timing... Learning the ins and outs of your equipment will make you a good shop owner. Finding the little known options in your software will keep you from getting headaches and wasting a ton of material and money. For example, in SignCut there is a step-by-step option that has saved my sanity (once I learned about it). This cutter had a tendency to screw up on really large cuts, but once I activated that one little feature, Voila! No more screwed up cuts no matter how long! Though it's not a contour cutting machine, I'm now working on getting it to do just that, though everyone has told me that it simply can't do it. Well, they're right. It can't do it the way a contour cutting machine can, but once I've got the math down perfectly, I'll post a video of this "non-contour cutting" machine doing just that. 5. Measuring tools are your friends! When we got our first 4'x8' aluminum sign job, it seemed like a really daunting task and my partner thought we wouldn't be able to pull it off. SOOOO, I got out my drywall T-square, tape measure and speed square (framing square that looks like a triangle) and began laying out the sign. One thing I've been very good about, is creating my graphics full scale and making notes for the placement in the drawing notes. When it came time to place the vinyl, I printed the notes along with the graphic from Illustrator and had everything I needed to complete the job and gain another happy customer that has spread the word for me and gotten me several jobs! Now, our motto is, "Business cards to billboards... We can do it." 6. Dry vs. wet application. I've used both methods, but wet is definitely the easiest and leaves the least bubbles. Dry application generally gives you one shot at getting it right, so be sure you've got clear transfer tape for those so you can see your measurement/registration marks. Wet is much more forgiving and as for application fluid, you really don't need RapidTac or any other name brand solution. The recipes on this forum are excellent. Mine is 3 cups of water, 1 cup of alcohol, and about 5 drops of liquid dish washing detergent. None of that makes any difference if you don't get your substrate clean, though. 7. Vinyl cutters are only good for a few things, I'm told... WRONG!!! I've made stencils for airbrushing and stippling, paint masking for vehicles, short run films for screen printing (using adhesive vinyl!), sandblasting stencils, and made serious money with heat-pressed/screen printed t-shirts and custom clothing! All that and more with one simple to use machine that cost almost nothing compared to the big name brands out there. 8. Don't let anyone tell you that you can't do it. I built my own equipment, including an exposing unit and screen press years ago and learned so many things along the way. The most important of which was that the easiest way to get me to do anything at all, is to tell me I can't do it. It can't be done. It wasn't meant to work that way. I can, I will, and it does! Experiment! Be willing to fail and you'll learn how to succeed! In this day and age and with the economy in the sad shape it's been in lately, my business is GROWING! I won't turn down any job, even if I don't have the means with which to accomplish the job! I'll research and build what I need, or find someone that will give me a good price and contract the work out. I don't have competitors, I have a network of shops that do my work for me! I still make money and my customers keep coming back! 9. Quit trying to sell a product and start trying to provide a service. Customers can't stand a salesman, but they'll listen to a complete stranger's opinion and trust in what they say. I don't cold call, I visit and shop. When I approach a potential customer, whether in a business or in the grocery store, I don't try to sell them anything. I do my best to find out what they want and give them options to get what they need. I was told once that, "You can have anything you want, as long as you help enough others get what they need." It's completely true. 10. Customer service sux! Nah. US Cutter's customer service has been outstanding! They must be putting something in the water over there. Every single time I've had to call and spend more than an hour with them, they've been patient and knowledgeable about their products. Once again, it's usually operator headspace and timing... or an ID10-T issue. Everyone get that? So, I guess you can see that I've been extremely happy with my purchase and the performance of my cutter! I'll be sure to post again when it finally goes belly up, but I don't think that will be any time soon... unless it's from over-working it! WE'RE STOKED! On Graphics
-
From the album: Stoked!
-

From the album: Stoked!
-
Random jobs and experiments from the last year or so...
-
-

From the album: Stoked!
-
From the album: Stoked!
-
From the album: Stoked!
-
From the album: Stoked!
-

From the album: Stoked!
-
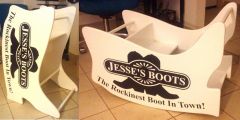 The Original "Rockin' Boot"! 3 in one high chair, rocking boot, and desk.
 -
From the album: Stoked!
-
We're gonna need some more info on this. Are you wanting to layer the colors? When you say good border, are you going to use a laminate over the whole graphic? Where is the bike color going to show through? If I were doing it, I would do a "path offset" of .25" on the white outline (delete the original path) and another offset on the black by .125" then stack the red on the black and the outlined path becomes the over-laminate to protect the whole graphic. Make sure to make registration marks corresponding to each color. kawasaki_zx12r-1.ai
-
We're gonna need some more info on this. Are you wanting to layer the colors? When you say good border, are you going to use a laminate over the whole graphic? Where is the bike color going to show through? If I were doing it, I would do a "path offset" of .25" on the white outline (delete the original path) and another offset on the black by .125" then stack the red on the black and the outlined path becomes the over-laminate to protect the whole graphic. Make sure to make registration marks corresponding to each color.
-
Man! That's an incredible idea! I've been pondering it for a while, with respect to the process and the materials. I had an idea for how to create re-usable stencils. Two options: Since everyone (assumably) has a vinyl cutter, you can cut mylar stencils. If you get a piece of sheet metal (ferrous) and use magnets (lots of little ones) glued to the top side of the template to hold everything down. Another option is to cut stencils out of magnetic sheeting with a metal platen. Just thinkin...
-
Combining airbrush with heat press vinyl?
stokedgraphics replied to stokedgraphics's topic in Other Materials
Okay, gonna hopefully try it today. I'll be using a test shirt that already has vinyl, but I won't be showing results, since it definitely won't be a show piece... -
Only my customers and friends have seen these...
stokedgraphics replied to stokedgraphics's topic in Show your work
This one was sold at a bike rally, then the customer had me do it up in Harley fashion. Unfortunately, lost the camera with the final pic at the bike rally... it was a reeeeeally good rally! -
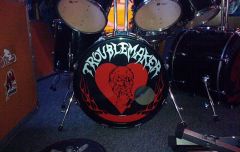
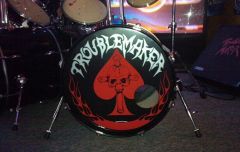
Only my customers and friends have seen these...
stokedgraphics replied to stokedgraphics's topic in Show your work
The second kick drum in the set. -
Only my customers and friends have seen these...
stokedgraphics replied to stokedgraphics's topic in Show your work
The rockin' boot in desk mode! Such a cool project to build! -
Only my customers and friends have seen these...
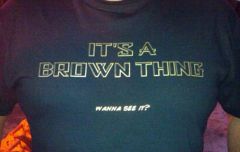
stokedgraphics replied to stokedgraphics's topic in Show your work
A shirt I made for myself about 8 months ago. A granite tile that I sandblasted, then airbrushed for my lady. One of a line of shirts (representation not a pic, don't wanna confuse anyone) in our ID 10-T line of clothing.
