

kelliann
-
Content Count
54 -
Joined
-
Last visited
Everything posted by kelliann
-
OWJones-I picked up the picture at Walmart for about $10. When you say completed picture, do you mean a photograph or in vectored format?
-
Thanks again. I added a Marilyn Monroe saying to a picture, but the signature and lips added the perfect finishing touch!
-
Thank you. This is exactly what I am looking for.
-
From the album: Random Projects
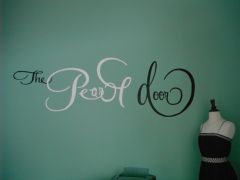
This project turned out amazing, but it took a few applications to get it right. I didn't realize that the Oracal 651 really isn't intended for wall applications. I first cut the design out in black Oracal 651, and the white in ShineRite. The black Oracal peeled off within a few hours. The white ShineRite was very tacky, and stuck without problems. I had to go back and replace the black with ShineRite (Oracal does make a wall vinyl, but I replaced it with the ShineRite, since I knew it would stick really well.) I would highly recommend only using a vinyl designed for wall graphics and not the 651 for wall art. -
From the album: Random Projects
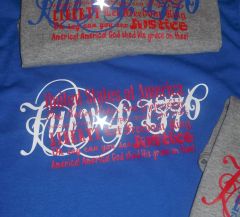
Celebrating the 4th in style! I layered some Siser Easyweed in red, white, and blue. I even added a reflective star to the shirts (but just a touch...that reflective vinyl is expensive!). I just love how they turned out. -
Thanks.
-
 Hey there neighbor, I am not too far from you. I am out in Graham.
 -
From the album: Random Projects
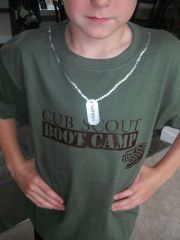
A local scout troop asked me to make a few shirts for their upcoming event. I used Siser Easyweed in brown and then I added silver dog tags with each of the scouts names on them. -
Thanks. The boys loved them, and they all went home with the right shirt!
-
It is easy to make a line/design larger on Sign Blazer by choosing the "Expand" button. When you click on the "Expand" button, a miniscreen will pop up, click the circle at the top that says "Outline". This will outline your entire design. Uncheck all of the boxes (Keep Original, Remove Overlaps, and Percentage). Then, down in the box for "Thickness", and type in the number 0.01. This thickness number will increase the line/edge surrounding your graphic. Start at 0.01 and gradually move up the scale by inputting the numbers manually. If you use the up/down arrows, the thickness increases too much, and your design may look distorted. I rarely go above a 0.05 on the thickness scale. Lastly, click on the "OK" box on the right. This change your design on the Sign Blazer screen. If you don't like how your image turned out, just undo your changes with the "Edit" button. Other features: *You can reduce an image by using the "Inline" feature. *I like to keep the "Keep Original" box checked when working on my designs. When this box is checked, the new design is layerd underneath the original design. The new design always pops up in Black. I try to have color on my original design, and when the black shows up underneath, I can see just how much the design has increased. I will adjust the "Thickness" based on how it looks. Good Luck with your project. Hope my little tutorial makes sense.
-
I ran out to the tractor with my color chart and the 651 colors are off just a bit. The closest color match is in a 751 High Performance Cast. I found #078 (folage green) and #617 (emerald) to be closest. I would go with the emerald. It is closer to the #613 (forest green) or #061 (green) on the 651 Intermediate Cal chart.
-
From the album: Random Projects
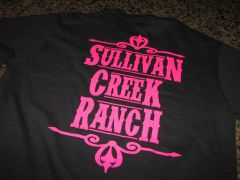
A fun design for the back of a shirt. The Neon Raspberry on Black looks fantastic! On the front of the shirts I made an old fashioned western star with "Sherrif" imprinted. These are a hit at Sullivan Creek Ranch in Montana. I love them in the toddler sizes. -
From the album: Random Projects
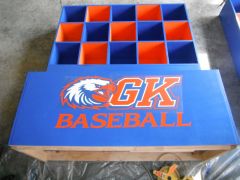
A parent contacted me to add the high school logo to a large box he was making for bats, helmets and other things for the baseball dugouts. We ended up making 4 of these. I used Oracal 651, which didn't stick really well on the painted plywood. Once a few coats of varnish were added to the top, they stayed down perfectly. These containers were quite impressive on their own, but the graphics we added sure made them POP! -
Yes they were rusty out of the bag. This was the second bag, the replacement bag. I am not worried about it, US Cutter is on top of the situation. I am very happy with how they are handling it, but in the meantime, I need some grommets that fit into my Big Blue.
-
The ones I got were rusty out of the bag. US Cutter is working on figuring that out, but in the meantime, I have some projects that I need to add grommets to. I just thought I'd see if anyone had used anything else, since I am kind of at a stand still.
-
I like my Big Blue as well. Lately I have been having issues with my grommets. They are rusting. Has anyone tried grommets by another manufacturer with their Big Blue? I picked up a few from the local hardware store to try them out, but they don't press well.
-
I needed to add grommets to some corrugated plastic boards so they would have some extra strength. Since I hadn't done this before, I grabbed a scrap of material to try it out. I used both #4 and #6 grommets. They went through the corrugated plastic easily. I found with my #6 grommets that if I turned the flat part of the grommet upside down in my press, the grommet fit snuggly together. The first one I tried, the grommet back wiggled after application. I tried it both ways with the #4 grommet, and there was no difference.
-
I did NOT pre-punch the holes for either of the sizes. I usually pre-punch for my banners, but I was experimenting on this piece, so I didn't.
-
I have a client that wants me to make a glass panel with their company logo on it for their waiting room wall. I have been looking into glass and plexiglass for this panel. Tempered Safety Glass is about 1/2 the price of plexiglass, but it is so heavy. The design will be about 3x4, and mounted on the wall, just above the chair rail. The glass company gave me a few tips: Glass-Cheper, won't scratch, won't yellow, heavier in weight, easier to clean.... Plexiglass-More expensive, can scratch easily, yellows over time, lighter in weight.... I am leaning toward the safety glass, but before I move forward with it, I am hoping that someone has done something like this before, and can make some recommendations. My concern is safety, so that the panel doesn't fall or break in a high traffice area like a waiting room.
-
Thanks for your input. Coaster36, the one on the right is the kind that came with my new Copam, thanks for adding the photo. I do love how it works, and hope that it is what I would order from US Cutter, and not the one they currently show on their website.
-
I am thinking of purchasing an additional blade holder for my Copam. I use vinyl of differing thicknesses, and spend a lot of time getting the blade in the perfect spot. I thought it might be good to have a blade holder for thin vinyls and one for thicker ones. I was just going to purchase one from US Cutter's page, but took a quick peek on eBay. I noticed that the one US Cutter has doesn't look anything like the one that came with my machine, and it costs $50. On ebay, there is a huge variety, and they look similar to the holder that came with my machine, at a fraction of the cost. I tried to call and talk to US Cuter support, but sat on hold for too long. So, I am hoping that you all will give me your perspective....I do have a few questions, Are the blade holders very specific to each brand of cutter? Any one know of another blade holder that works with the Copam? Thanks.
-
I heat pressed on satin the other day. I was a little worried about it, since it was for a graduation stole. I used Siser EasyWeed. I couldn't find any specification for the satin, but tried it out on some sample fabric I had lying around. It pressed well. I had the temp at 305, and set it for about 8 seconds, but no more than 10 seconds. I noticed it started to smoke/steam at about 10 seconds, which kind of had me worried. Luckily, the fabric didn't burn. The only negative is that heat pressing this material left a depression from the edges of the EasyWeed backing material, so in the future, I will trim it closer to my design. Overall, it worked well. If I do it again, I think I will try it at a lower pressure setting.
-
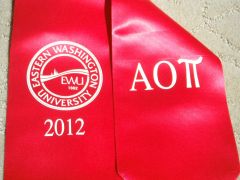
From the album: Random Projects
I heat pressed on satin the other day. The CWU logo was already silk screened on the stole. I was asked to add the sorority and year. I was a little worried about adding this to the satin, since it was for my clients graduation attire. I used Siser EasyWeed. I couldn't find any specification for the satin, so tried it out on some sample fabric I had lying around. It pressed well. I had the temp at 305, and set it for about 8 seconds, but no more than 10 seconds. I noticed it started to smoke/steam at about 10 seconds, which kind of had me worried. The fabric didn't burn, it left a depression from the edges of the EasyWeed backing material, so in the future, I will trim it closer to my design. Overall, it worked well. If I do it again, I will try it at a lower pressure setting. -
 Love the font you used for "Red". Very classy.
 -
You probably need to elevate the center where you are putting your design. Try a teflon pillow under your design. When you put the onsie on the heat press, most of the pressure will be applied to the neck and arms where the binding/stitching is the thickest. If you raise the design area with a teflon pillow, there will be more pressure on your design. I first tried it with a piece of material folded up under the design. It worked, but the teflon pillow works best. I found my teflon pillow at imprintables.com.
