

Wildgoose
-
Content Count
6,515 -
Joined
-
Last visited
-
Days Won
293
Posts posted by Wildgoose
-
-
I agree. As mentioned above, SignCut has, I believe, the very best tech support of ANY cutting program out there. Live help with real people who will even remote into your computer if needed and get you going. You have to request a session and they contact you pretty quickly. It will start out as a chat session which is usually sufficient.
-
 1
1
-
-
-
6 hours ago, Junior said:slice&dice with Etsy people charge for shipping also which is any where from $5.85 to $17.00. With the $20.00 shipping is included. So should i lower the prices. As i want to make money not keep doing it for friends for next to nothing or free. I like for advice as you all been doing this a lot longer than i have. Just needing your advice as with Etsy they charge for shipping my prices is included in the shipping. Please i am asking for your advice. As you all been in this a lot longer than i have Thanks
Ready to ship in 3–5 business daysCost to ship$12.35Ready to ship in 1–3 business days Cost to ship $13.20
I would drop the free ship and be closer to the competition. Most people see the bottom line before calculating the shipping.
-
1
-
-
I have a HF cabinet and do a little blast etching here and there. I found it was NOT a money maker for my business platform. WAY too much time investment to make it work out for me but that's just me. I now mostly do personalized gifts that I give to people from myself not as business. (although it has occasionally generated some interest that I ended up doing) For instance, I have a friend who brings over pies and I always etch her pyrex pie plates before I return them. Stuff like that. Customized wedding Pyrex sets are great gifts too. I usually do them mirrored so you can read them from looking into the pie plate or pyrex cookware. Cheap glassware from the dollar store suddenly turn into sweet personalized Christmas candy jars. Fun stuff but I can't afford to try and do them to sell. Maybe you can find a niche there, good luck.
-
1
-
-
I would do some while you're at it. You'll only be out the app tape and and a little time. If your tape matches your roll width your not even out that. Do your best to store them in a safe place out of the light and flat if possible. I have installed older decals I had made and it went ok. Worst case you can offer as a reduced price inventory reduction item and still recover some coin.
-
On 11/13/2020 at 6:23 AM, VinylM said:That’s great info for a starter. I’ve been doing decals for years a d trying to avoid shirts cause the market is swamped. Lately I’ve been getting requests do thinking I might get into it. Can you tell me which heat press you would Recommend? I’m an all in type of person so I don’t want to go w beg hi we and then just keep upgrading. I’d like to start w a great on right off. Thanks
I use the Hotronix Fusion. Somewhere I did a write up on it. The quick change platens and true threading of shirts make it the machine of choice for me. However the brands listed by Dakota are all great and Hix is also a good brand. I prefer a swing away press but they take up more space. Definitely go with the 16x20 platen. Smaller stuff will need press pillows and press pads if you don’t have other sizes of platens but the larger size is worth it for most work.
-
2
-
-
They may be buying from a third party vendor who actually IS licensed and just retailing the product which I THINK is legal or could be arranged possibly with some small discount from the vendor to allow a modest profit.
I tried to see what it would take to get licensed with a local university (that my kid was attending at the time) and the department that handles that stuff basically lined out the specifics that are major quotas and some sort of accounting/inventory program that tracked everything that had to be running so there were no "lost or missing" items etc... It was in the tune of tens of thousands of dollars up front. I just wanted to make a hoodie for my kid rather than fork over their exorbitant price. The cool part was that they told me that if it was for my own use (ie. my family) that I was not breaking any copyright or trademark law. They went as far as to "ask" that I refrain from making something that did not properly express their Brand. It was a surprising and enlightening conversation. I followed up with an attorney pal about this and he confirmed that they hold trademark on the brand and obviously the copyright as well but that in the US there are no restrictions on what someone can make for themselves if they have the ability. Cannot sell it or even give it away as that would be diluting their market and a breach of trademark law. That long winded story does little to help you but I feel better.

-
4
-
-
I'm pretty sure that SCALP will import SVG files. At one point I tried out a beta version of SCALP and it seemed to import SVG fine but sometimes the scale went off. I think I could have found a workflow to tune that into shape but it also handled blood sucking adobe files too and they came through better. I found the program lacking compared to SignCut Pro1 so I stayed with them.
I DO design in Adobe and yes it's cost prohibitive for non-business users who don't have large wads of spare cash to donate to the cloud every freaking month. I have a hard disc CS5 Illustrator version that I ran since that was new (2010 ish) but upgraded to a new iMac recently and decided I needed to step it up with cloud. The CS5 version on my old mac (which I still have in another room) will crash in certain situations when using the font viewer which was becoming more and more annoying. The CC does not have that issue. I have an ipad pro too and adobe recently released compatibility with that which is really nice. I don't like having a monthly payment (I paid yearly but still..) but at least I can write it off and having my files available wherever I happen to be via the cloud is a nice perk.
Good luck with your new endeavor. I doubt you will fall in love with SCALP as a design program but I think you'll be able to use it as a cutter interface.
-
1
-
-
It would be a good idae for you to officially sign up to the forum so you don't have to wait for a MOD to approve your posts.
-
1
-
-
5 hours ago, dvddvd said:Ok thanks as i said i can not print because lots of the design is in free air its not just a block of stacked vinyl there are hundreds of tiny bits to the design which are away from the main part. Which in the end will be stuck to a piece of opal perspex with a light shining through..thanks
Just FYI regular vinyl will not necessarily allow light to pass through very well in most cases. They make translucent vinyl that is specifically for back-light applications. Also be aware that layering translucent can have some interesting outcomes also. (think primary colors and how they blend)
-
2
-
-
I am betting you'll be fine. I agree with slice about trying out the free trial just to be sure. There are other options if it's a total fail but they cost more. I run in adobe and export to SignCut Pro 1. It costs either a monthly fee or a Dongle purchase expense so hopefully you can make the SCALP program work for you.
-
1
-
-
On 11/1/2020 at 8:28 AM, Thetrashnoob said:Looks like they are sold out of the 28on eBay, but they do have the 34, which I have decided to purchase, just need to wait until payday to order it!
You're going to have a good time owning a cutter. Like has been mentioned, once people find out you have a cutter they will flock to you for odds and ends. It takes a little bit of practice to learn a few of the basic tools of the trade but once you get the hang of it the rest comes with time and experience. Vinyl is relatively cheap and if you mess something up you just cut another one and try again. I spent about 6 months doing friends and families stuff for free just for practice and they told other people and soon I had more than I could keep up with.
-
3
-
-
So I'm trying to understand your question. Are you saying that you HAVE the rounded rectangle (previously created) and want to ADD a second one without rounded corners and then cut them both? Do you want to cut them at the same time or separately? If at the same time are you wanting a "compound shape" with the inside one being a hole in the outside one? Or two separate colors and therefore two cuts? Maybe a screenshot of what you are working on would help to understand what you are dealing with.
-
5 hours ago, inosome said:I am working in VinylMaster LTE v4 and I have Linotype Helvetica® Now Pro Text Medium (OT-CFF) purchased and installed on my Windows 10 Pro 64 bit desktop.
I have that font set as my default font in VinylMaster and I need a Capital Height or Physical Size of .5 (i.e. 1/2) inch for me job.
Yet, when I set the physical size to .5 inch the product both cut, on-screen and printed is much smaller than 1/2 inch and to achieve the 1/2 inch all capital letters I must set physical size to around .780
I have also tried setting size to 36pt but get exact result as .5 inch setting.
This does not happen with Arial of Calibri etc and in MS Word the Helvetica font is true to font size setting...i.e if I set .5 inch the capital characters print .5 inch.
I am not a professional and a novice to VinylMaster but I have tried researching this issue and am somewhat confused.
It would be most appreciated if somebody could give me some help with this.
Thanks

I find so much difference between various fonts that I build a box the size I want the text and make sure it fits one time then I know what font size to use for that file. Additionally very few letters are all the same size regardless of which font. So it's all realative.
-
Needed to drain a little off the top for tax purposes and failed to convince my significant other that I needed to replace my perfectly good cutter (which I also failed at last year about this time) so I upgraded my old 2010 iMac for a spanking new one. I opted for all the bells and whistles on this one (short of investing in an iMac Pro, those things are a bit above my budget). Loving the new machine! My old 2010 was maxed at 16gig ram and all it would hold but the new one has double that so she's like a sports car.
I went one step father and also invested in Illustrator CC which I have said I would never do. I was having too many font related crashes in Illy as I upgraded my old iMac and it sounds like that's what happens with CS5 and CS6 as the new Mac programs have some issues somewhere in there. I still have the old one and just handed it down to my wife so it's still in the house should I need it. Hers went off to one of the college girls who could put it to use.
So it's sort of like early Christmas for me here and I have a smile on my face right now.
-
1
-
-
15 hours ago, VisualExpressionsNJ said:so i just did another test and if i make a 1/2" box around the contour cut, it cuts completely fine.
Probably some gremlin in the driver that is messing it up. Good work around with the box.
-
1
-
-
I'm with Skeeter. A cutter is a cutter and the same very basic setup is necessary as a user no matter the cutter from top of the line down to the bottom rung. I realize that they don't also sell you the knowledge to use them, you have to figure that part out. A cutter is a specialized tool. The use of a cutter is more a craft or a trade than something like using a printer or a laminator. I am self taught as most on this forum. There may be a class you can pay for somewhere (although I have not seen one) but most of us on the forum here figured it out on our own. To be honest, it's not rocket science and while a little confusing at first if you have some patience you can do it.
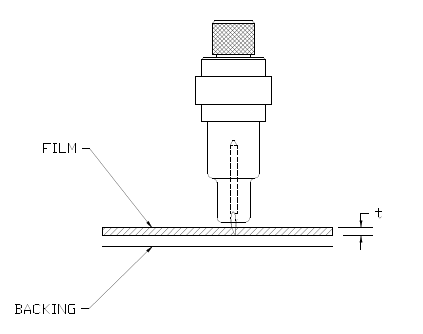
Set the Blade depth (also sometimes called blade exposed) This is not to be confused with cutting depth, this is just how far the blade sticks out of the blade holder.
Set the speed parameter which I personally recommend being set at 1/4 of the max speed for your cutter. You can speed up or down from there. Videos of other cutters help with what speed you should run. I am not a fan of running too fast but some people run flat out max.
Set the down-force or blade cutting pressure. THIS is what actually determines how deep you cut into the vinyl. It is best to start low and work up so that you don't cut all the way through your vinyl and carrier and brake a tip on your blade (and damage the cutting strip)
Set your blade offset. (should have been set roughly based on the recommendation that came with the cutter. These vary a bit but I think a standard blade will be around 0.35 to 0.45 mm but each cutter is different. My current high end cutter has my normal blade at about 0.35 and my heavy duty 60deg blade at 0.90mm so there can be a lot of difference. This value is basically the distance from the true center of your blade to the blade tip that is ground a ways off from center so that it will work like the castor wheel on a shopping cart as the cutter drags it around the cut job. It has to compensate for the distance as it goes around corners to keep the cut in the right place.
Possibly set Overcut. This is a little bit of distance that the blade travels after the end of a given object is cut so that the stopping point connects with the starting point. Most cutters do NOT need offset but it is usually an option to allow users to tweak things if they are finding that their cuts do not complete. It is usually no more than the same number that the offset was.
That is about all there is to any cutter setup. Doing this one step at a time and making sure it is as spot on as possible makes ALL the difference in the quality of the cut. Little things like ignoring the significance of the very first one (Blade Depth) have surprisingly big consequences. I am attaching a couple pics of helps that may benefit you and future searchers.

-
3
-
-
I absolutely guarantee they have some money invested if they actually filed a trademark. A client of mine has a cool logo and is working on getting it trademarked to use for other uses than for what he currently does (hard to explain without divulging his logo which he would not want me to do since he is in process of obtaining TM). Anyway, talking to him, it's a long and drawn out expensive process depending on what level or aim of trademark you are going for. It's truly one of those things that the rich get richer in a lot of cases because those who may have come up with an original idea do not always have the means to do something substantial with it.
pawdell - theoretically you could pursue some sort of substantive litigation due to provable copyright infringement if it's clear cut enough. If it's just a trademarked word group, good luck, not likely but if it involved word ART or some graphic specifics that they took from your design you could be entitled to some real coin. I am one that does not agree with the practice of trademarking a saying. I think that's bs but I don't get to be in charge. (for good reason!!!! Ha ha ha!)
-
2
-
-
I agree with Nudy649, the handles are susceptible to wear and may start to fail as they get worn. I have heard of people who carefully drilled out the worn holes and replaced the pins with the new sized pins but that would depend on your level of ability to make modifications. I don't know that replacement parts are available for handles and such on the budget presses but maybe there are.
-
1
-
-
Looks like your actual file is probably not prepared correctly. The B in the above does not have the inside of the letter which likely means that it was not expanded? I'd have to see the actual file. Are you expanding the letters before sending them to the machine or are you letting the plug-in do that? You always want to expand all letters and any stroked lines to outlines.
Verify that the B still has the inner parts of the letter in the file and temporarily change the color of the inner parts to something other than the other colors in the file. They may need to be moved up in the layer stack to be above the main letter. You may have inadvertantly placed them on a different layer altogether which will prohibit you from allowing them to interact with each other. Once they are on top and within the same layer and either in the same group or all parts not in any special group then you can select all three parts of the B and use Command+8 on mac or Control+8 on a pc to create a compound path.
Text will generate properly when you turn them into outlines and you should not have to do this unless you have done something to separate them (most likely released the compound paths in the file which is indicative of all these letters missing the inner parts) Alternatively you can place the missing parts on top of the main letter (B) and use the minus front to create a compound path however if there are more than one piece as in this case then the two or more parts have to themselves be made into a compound path using the same command+8 operation. It sounds confusing but isn't once you understand that by creating a compound path you are telling illustrator that you want the group of objects to be considered one object.
-
2
-
-
18 hours ago, The Flaming Eyeball said:I know this is an old thread, but i did the same thing. Bought the starter pack with all the cheaper stuff. I used to have an ancient Hix press, but gave it away after not using it for several years, back when I was doing airbrushing. Anyway, noticed my Siser Easy-weed Stretch wasn't sticking to my Bell + Canvas shirts after the first press, started to come up around the edges....ARGH!
Got out the laser dog toy (well, that's what my kids use it for) and found out the temp setting at 305, was really only 287! What! So I had to go all the way up to 328 before the platen reached 305. Repressed and now the shirt is in the wash doing it's first test.I'm so glad I did some test shirts before sending to a customer. Nice to know Stretch can go a bit higher and still be OK.
The spec on Stretch has be modified to up to 320 for 20 seconds now. They were having too many occasional failures and changed that last fall. I asked them of that was a change of adhesive and should I continue with my older stuff at 305 and they said no just crank the heat and dwell time up on all of it.
-
1
-
-
According to Oracal the maker of the HT55 they say the tape has added adhesive thickness to allow it to get down into the matt finish a bit better and thus help with transfer rather than that it is extra tacky. I have used the HT55 and it was ok but matt finish is a PIA regardless of the tape. My 4076RLA worked about the same IMO.
Medium tack paper is good but if you have smallish elements it may not hold them well and they may stay on the carrier. Conversley too high tack and it can be an extra pain to remove the tape after the install. Paper tape doesn ahve the advantage of being able to be wet down with a spray bottle and help remove but don't do that if you have water soluable vinyl like 631.
I stopped doing wall installs. Can't bid them high enough to make any money. They are almost always a trial. Bear that in mind when you sell consumer install work. If they are putting them on a wall they may have a bad experience that has nothing to do with your product but you will get the blame.
-
1
-
-
haumana are they running on a windows or mac platform?
-
Is your vinyl the lower grade or higher grade stuff? The low-grade I think they call mono-meric is what we call Calendared here in the states and the higher end stuff is called Cast. Cast will withstand the shelf a bit better than the cheap stuff. I don't know the answer to your question as to how long you CAN store them, at least not anything that the manufacturer would agree with. But for the record I have stored some things for a long time and they still seemed ok. Years even, but they were not something I was selling to anyone. They were all stored with paper tape though. The clear usually has more trouble especially with temperature changes it can "tunnel" easier than the paper will. Most of us use paper.
Prep for first shirt run... What do I need
in General discussion
Posted
I do mostly shirts these days. For a beginner I expect you'll be keeping the budget low. You can just use some Parchment paper like you bake cookies with for a cover sheet. It's cheap and easy to get more about any store. You can get hundreds of press cycles before it starts to brown and nothing, NOTHING seems to stick to that stuff. If the budget allows, a teflon cover over at least your lower platen is nice. It lets you slide your shirts around much easier on the press. I now run an upper platen cover as well but didn't for many years. If you do run a top cover you can skip the cover sheet and just press things without too much worry. I do add a couple seconds to my dwell time to compensate for the teflon.
You will also benefit from some sort of see-through craft ruler or other alignment tool. You will be finding the center of your shirt (possibly making a crease) and then using the ruler to get consistent offset from center and distance down from the neck. I do so many now that I bought a fancy laser tool from Hotronix but it was several hundred bucks. I do a lot of sports uniforms that all have to be laid out the same spacing and could not live without the laser thing so it's been a good investment.
For press pillows you can also get by with a mouse pad or two stacked up to get a left chest on a polo with buttons etc... I bought a 12x14 press pillow that I have worn out the foam in three times. I just buy 1" thick foam at the fabric store and re-stuff it when it goes flat. If you are handy you can make your own with some teflon, foam and a sewing machine.
HTV is a great hobby and can turn into a good source of revenue if that's what you want.