

Wildgoose
-
Content Count
6,515 -
Joined
-
Last visited
-
Days Won
293
Posts posted by Wildgoose
-
-
On 9/9/2021 at 7:46 PM, Manjot singh said:Hello
I am looking to apply a HTV on a 50/50 polyster cotton blend tshirt. Has anyone done this?
Can someone please share the details like pressing time, temperature setting on a regular home Iron.
Not sure what brand go HTV you are planning to use. I assume that you'll use Siser because they claim to be home iron friendly. The HTV won't care what fabric unless its Nylon. If its a tri-blend you would be best going with Siser Stretch but they now have 320 as an application temp instead of 305 which you probably can't get up to with an iron. Read the application data on whatever brand you end up with because they are often a little different brand to brand and even type to type within brands.
The elephant in the room is the hand iron. If this is a one off for you or your kids that's one thing but you will never get a good application that way. Consider purchasing an actual heat press. Even the very bottom of the barrel choice is WORLDS above a hand iron.
-
 1
1
-
-
I would print every day. I don't think it has to be a whole lot but run a nozzle check so every nozzle get s squirt. I did for quite a while and then forgot to an soon had a plugged head. At one point I tried to set up a program on my mac that would strt up and print every day like the solvent/ecosolvent printers do but I had limited success with that. I was able to go on trips and come back several days later and not have any issues though, BUT the sublimation ink seems to have fairly high amount of solids floating. The main problem with the Epson is that the actual print head part stays in the machine and you just change out the cartridge of ink. (that is part of why the ink cost less) Most inkjets have the pintehead as part of the ink container so you ger a new print head every time you change ink. They are a real PIA once they get plugged. I was succesful on clearing one plugged machine but my other one ended up in a dumpster. The WF7710 was what I was using at the time I think I had only paid a couple hundred for and I did a sublimated set of jersesy for a softball team so it had paid for itself on one job. Things may have changed since then, I haven't followed prices or the latest printer tech. I have gotten so busy with tee shirts that I stopped taking on a lot of the peropheral things. I DO miss playing aorund with trinkets like dog tags and key chains etc...
-
1
-
-
I have a client that likes the flag on a shoulder. I just flipped it around so the stars stay and I weed off the background and it's easy. IF they insist on the other way I up-charge for the weed time. Honestly if there are a bunch I end up doing a plastisol transfer these days but sometimes that takes too long to get the job done.
-
I would give you a tip if you are needing to keep the overall layout the same as that pic (not neccessarliy the case)
1.Import the image into your sofware
2.Resize it if neccessary to be in or near a certain scale. (this may cause issues with pixelation of the image so you may need to resize after vectoring)
3.Reduce the opacity to 50% or 60%. (this will aid in visibility as you do the next steps)
4.Lock the image so you don't accidentally get hold of it while working.
5.Design ON TOP of this image so you can type out things and preserve the original appearance. Even if you can't match the exact font, often that is not super critical to clients. You can hand trace a simple object like that truck in a few minutes once you get used to your software and the texts can all be typed out like has been mentioned. Once you type your text you can adjust kearning and spacing and stretch thiings around to get the layout to match up to the inderlying image and recreate it to near perfection.
These steps are a good workflow to consider for most jobs. I also save a "working copy" prior to converting fonts over to outlines so that if I need to modify something later or if I mis-spelled a word I can easily make changes at some future time. (this happens more than you woud expect) Then I save a cut ready file and remove all the background stuff and convert all the text over to objects (outines) so it's a cut-ready file. If it's HTV tee shirt work I mirror it all at this time too.
-
Second plug to remember that you are cutting on the adhesive side so all designs need to be mirrored. (in case you missed or glossed over that). I once forgot to mirror and made around 100 copes of a left chest logo that were all backwards. I now save my files already mirrored so I have to un-mirror them if I am cutting on regular sign vinyl.
-
1
-
-
Awesome pulling tractor Pop. They do a little of that in my area. (Idaho)
-
I don't know much about the Ricoh printers but I used to run an Epson WF and went back and forth from sublimation to regular ink several times without any issue. If Ricoh uses regular ink (not gel) the sublimation ink seemed rather watery and was not hard to flush out when going back and forth.
-
10 hours ago, Hazellarkin said:I absolutely plan on investing in a cutting machine I just don't have it right now. I did etch/engrave a bunch of hip flasks that I ordered and they sold super fast. I think that there is still some value in doing things the old fashioned way.
Yeah I guess there is. Still... you are selling your time. When I upgraded to my Summa I sold off my old P-Cut to some people who ran a Halloween scare house and they had been hand cutting vinyl graphics for doors, walls and windows. When they got the cutter working they were like kids at Christmas with wonder and amazement at the details and speed that even that very low budget machine could produce. The guy told me he spent a couple hours on each decal he had done before and the P-Cut was cutting them in under a minute start to finish.
-
I have a junk bin that I throw it into but rarely pull any out for anything very constructive. It makes decent tape and we do a lot of t-shirt press work which leaves a lot of lint around the workspace and I use the scraps as a sort of lint roller/tape and wipe up the lint from my press and work table.
-
1
-
-
I don't do much window work anymore but the few times I have had a situation like this I removed the peice completely that would have been where the frame is. I wouldnlt try and put the little bit on the frame and definitly not wrap the design up the side and over that frame. The human eye will ignore the missing part perfectly and almost no one will even notice. You will of course, but that's also typical, the installer is the worst critic.
-
1
-
-
I think it's either a tracking issue or some sort of x/y calibration issue. I wouldn't even know how to dial that in on a MH cutter.
As to the double cutting/drawing, take a look in outline mode. If you are having this issue with text it is because the cutter/plotter is designed to cut vinyl and the text litterally has an outline rather than being a single line so the cutter is tracing the outside of each letter so it does in fact have two lines. In the case of vinyl work the end result is a letter that is left after removing the excess unused vinyl (weeding) and you see a letter. In your case you get an outline around the edge of the letter as traced with the pen. Your plotter/cutter is capable of just doing a single line but the software you are using may not be capable of producing DRAFT like effects due to it being designed for vinyl cutting rather than plotting out a scaled drawing.
-
On 6/11/2021 at 11:22 AM, myko said:Hey All,
1st post here and hoping some of you may be able to help.
When I import and image from Adobe Illustrator that is 22"Wx35.5"H, Cutstudio opens the image @ 2.2"Wx3.55"W. Any ideas why the image dimensions come in smaller when importing files?
Another issue I'm having is increasing the size of the artboard. What is the max size?
Thanks for your help!
You are going to have to determine which program has the issue. Upload a simple AI file with something like a square or rectangle and I'll open it and see what it transfers over. I have been moving and doing a remodel/addition so I'm in and out of the forum lately but I'll try to pay attention. lol
There is a quick key on the tools menu that lets you drag the art board to any size you like. AI DOES have a max size of 227 inches (I think)
Also some info. What file type are you exporting as? Some programs need specific file types or versions. I am unfamiliar with Cutstudio so can't help with that program but I use AI religiously. I use SignCut Pro 1 and it likes to have older Version 8 Adobe files. It will accept other types but they often come through out of scale like you are talking about. SVG are smaller files and I tried to convert over and start using them but they were inconsistent in size so I quit using them.
-
1
-
-
1 hour ago, YerrytheYanitor said:Is it possible to have the Graphtec CE6000-60 intentionally cut through the backer of my vinyl? I want to make my stickers easier to peel and stick, without having to use transfer tape.
You can put it on a cutting mat and cut through. If you don't have something to act as a carrier sheet then it will all come apart in the middle of the cut and have a big mess. The CE6000 MIGHT have the KISS CUT or PERF CUT option that bounces up and down creating a perforated edge but I don't run Graphtec so I am not sure. My Summa will do that for printed work. It is hard on cutting strips but may be worth the trouble for mass sales of peel and stick type work.
-
1
-
-
22 minutes ago, dinki said:So here's what I found:
My blade appears to be WAY too far out when comparing to what @MZ SKEETER suggested. I backed the blade way back and was surprised that, yes, it still cuts even when only that tiny bit is exposed. I tried by hand and was able to cut out a square that could be weeded. I moved to the cutter and slowly worked my way from 120g up up up until I was able to cut the cutter's test pattern triangle. I think started cutting small text and slowly crept up until I was able to cut small text repeatable and all pieces stayed on the backer. This turns out to be 350g which is way more pressure than I've ever used. I then started cutting text smaller and smaller. I cut text from 0.4" to 0.25" with only the 0.25" having any problems. On that cut, I ended up losing a '1' character. I think I will try these settings for today's orders and see how it pans out.
Again, thanks to all for the help. You've increased my speed by 100%!
")
One trick I was told from my SummaCut tech support is to get down at eye level when the cutter is running and be sure you can see a very slight air gap between the blade holder and the actual vinyl. If the blade holder is dragging on the vinyl when cutting you would need a slight adjustment but if it's got some gap and you are cutting through then you are set correctly.
I still question the blade tip. That is a LOT of pressure. Could be that your machine doesn't read accurate gr of pressure but if the very tip has broken or been rounded off it will do similar. I have found that a few times when cutting HTV which is a bit more demanding on blades. If the tip was not pristine I start having issues with needing more pressure and I usually save those blades for use when I need to cut something nasty like glitter. Still useable but not pristine.
-
1
-
-
I wondered about the tip of your blade as well. Each cutter runs at different downforce numbers but your at 120g which with a Clean Cut blade should be well into your cutting strip.
I am unfamiliar with the Seiki 720H, is it a servo or stepper motor? If you have had it for 15 years it may be reaching the end of it's life cycle. These things do wear out eventually.
-
1
-
-
Several HTV suppliers say you can install with a hand iron (even Siser) BUT we who do this a lot do not recommend it. If it is for a one time costume that doesn't need longevity then you will get by... mabye. Getting enough heat AND pressure for the required dwell time are really hard with a hand iron. ALSO the Cricket press thingy-ma-bob is basically a large hand press iron so you're not getting much better with that thing. Even the most basic clam press out there will spank any hand applied option. If you think you'll do more than one shirt and you already have a cutter, a press of some sort will help you out immesurably. USC has a few options at very low price points for beginners.
Like everything, you do get what you pay for and a little more investment will pay off in the long run if you do more later. If you can find one with a center point pressure or springs that allow the upper platen to adjust to differing shirt thickness you would be smart to go that route. HTV is very finicky about getting even pressure across all the area and some of the budget presses do not preform as well.
Also, the bubles you are seeing are not uncommon even with a heat press in some circumstances. IF they are really small they may have no bearing on langevity. Most HTV will show the weave of the fabric as well.
-
1
-
-
On the temp just make sure the coolest place is at the minimum temp for the product. The areas that are hotter will be fine. Almost every heat applied product can handle a pretty wide margin ABOVE the minimum temp without any serious consequences. Also bear in mind that hats are rarely subject to the same torture than regular clothing is so there is some comfort in knowing they are rarely washed and usually aren't stretched and abraded like a shirt.
Some presses have different interchangeable lower platens that help fit various hat sizes. I have the press that slice&dice pictured. I tend to use the smallest lower platen most of the time. It limits the height of the design to about 2.25" tall but is the easiest to get the hat to conform and usually is large enough for most basic logo's. This is especially true if doing a smaller logo on one side of the front two panels which has become very popular of late.
Whichever press you have I find it helpful to pre-heat the cap and then stretch the material over the platen while it's good and warm to get it to lay flatter and often do a second pre-heat for a few seconds. The press in the above pic also has a spring loaded hold down that helps keep the hat tight during the process. Not all presses will have this option and it's of great value and worth considering when picking a press. You may want to invest in a roll of heat tape as well to help hold your design in place as you press.
-
2
-
-
7 hours ago, lasakro said:I'm about to order an SC2 and don't want to send it back. Has anyone have the Title above working? I read the above will theoretically work. A VM is not an option for me, neither is Windoze. He can't make virus proof OS so they put him in charge of planetary extinction.
There is Inkcut that is supposed to be compatible with Ubuntu. No idea if it works or how well. You sound savvy so it may work for you. Here is a link:
https://sourceforge.net/projects/inkcut/
Worst case you may have to find an older windows XP to dedicate to the cutter and run the VM Cut that should come with the cutter. Many people do that for pretty cheap. I'm a Mac guy and even Macs have limited options (SignCut Pro for me) but Linux is stepping out onto the path less traveled. Good luck. Cutters are freakin' awesome.
-
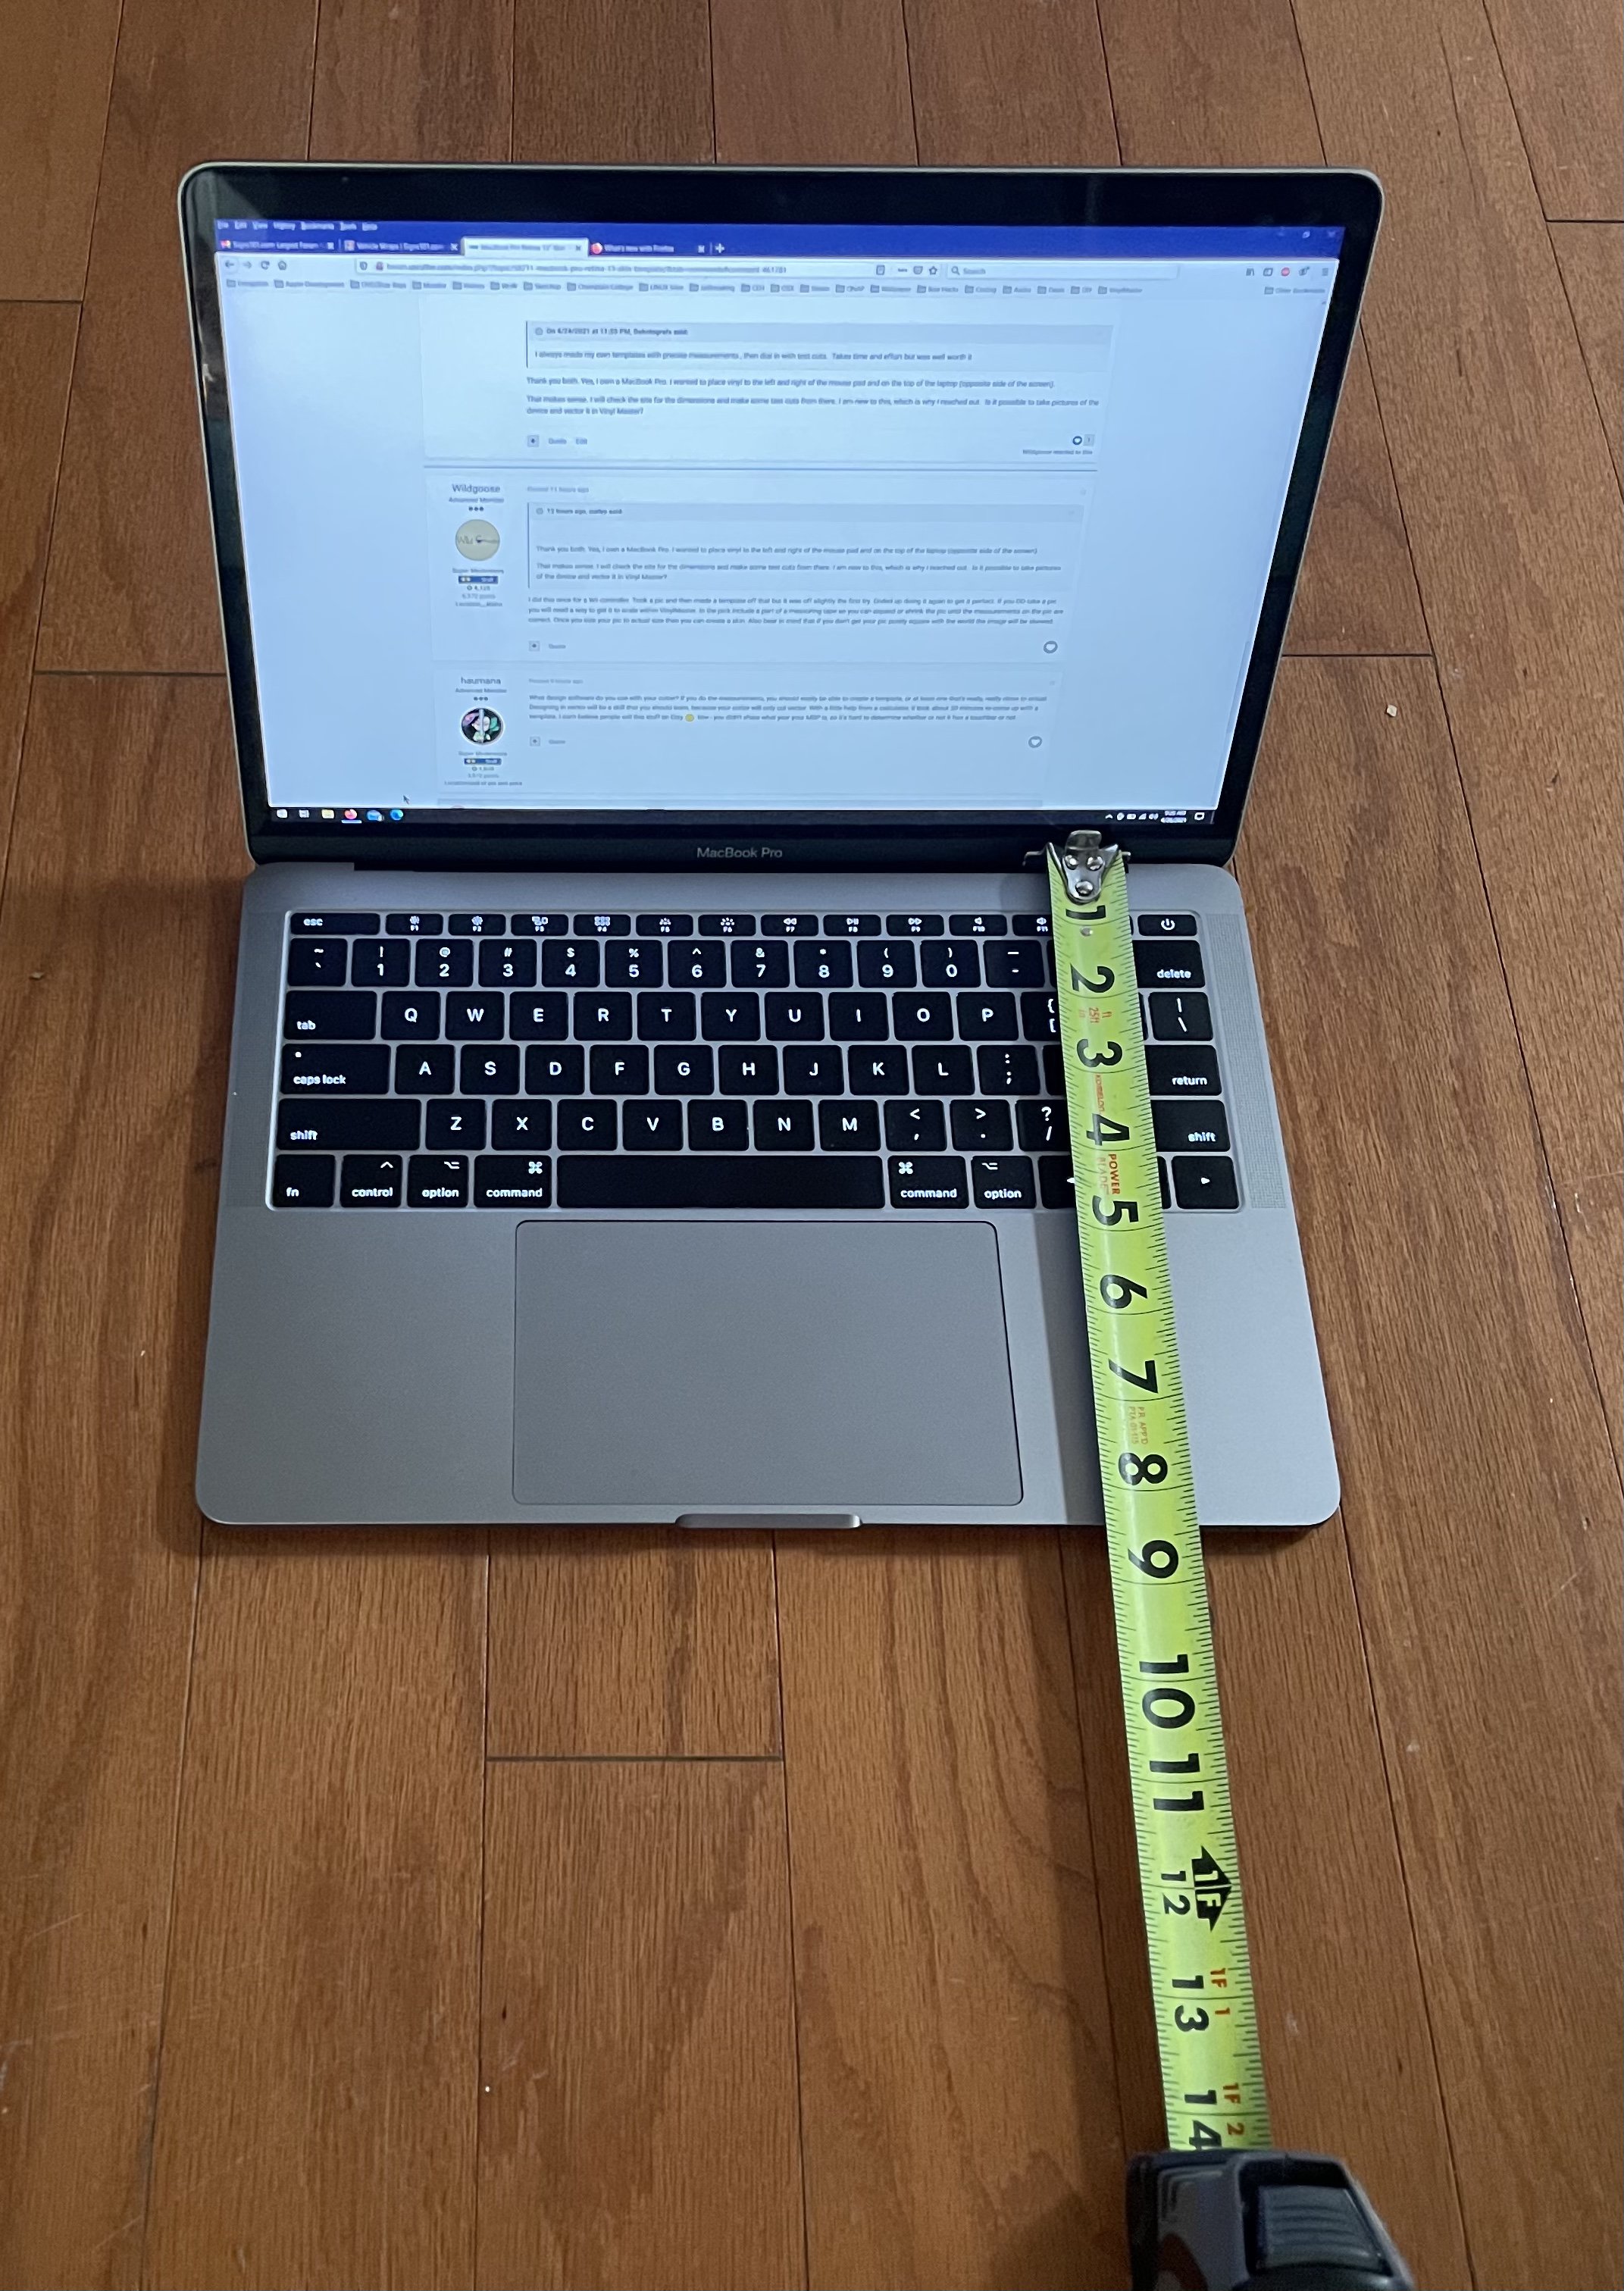
On 4/29/2021 at 10:53 AM, Dakotagrafx said:this is what goose is saying - I put a square mask around your computer and cut it so you can visualize the distortion created by the angle and the picture not being straight down
That's it exactly. Thanks Dakota.
-
1
-
-
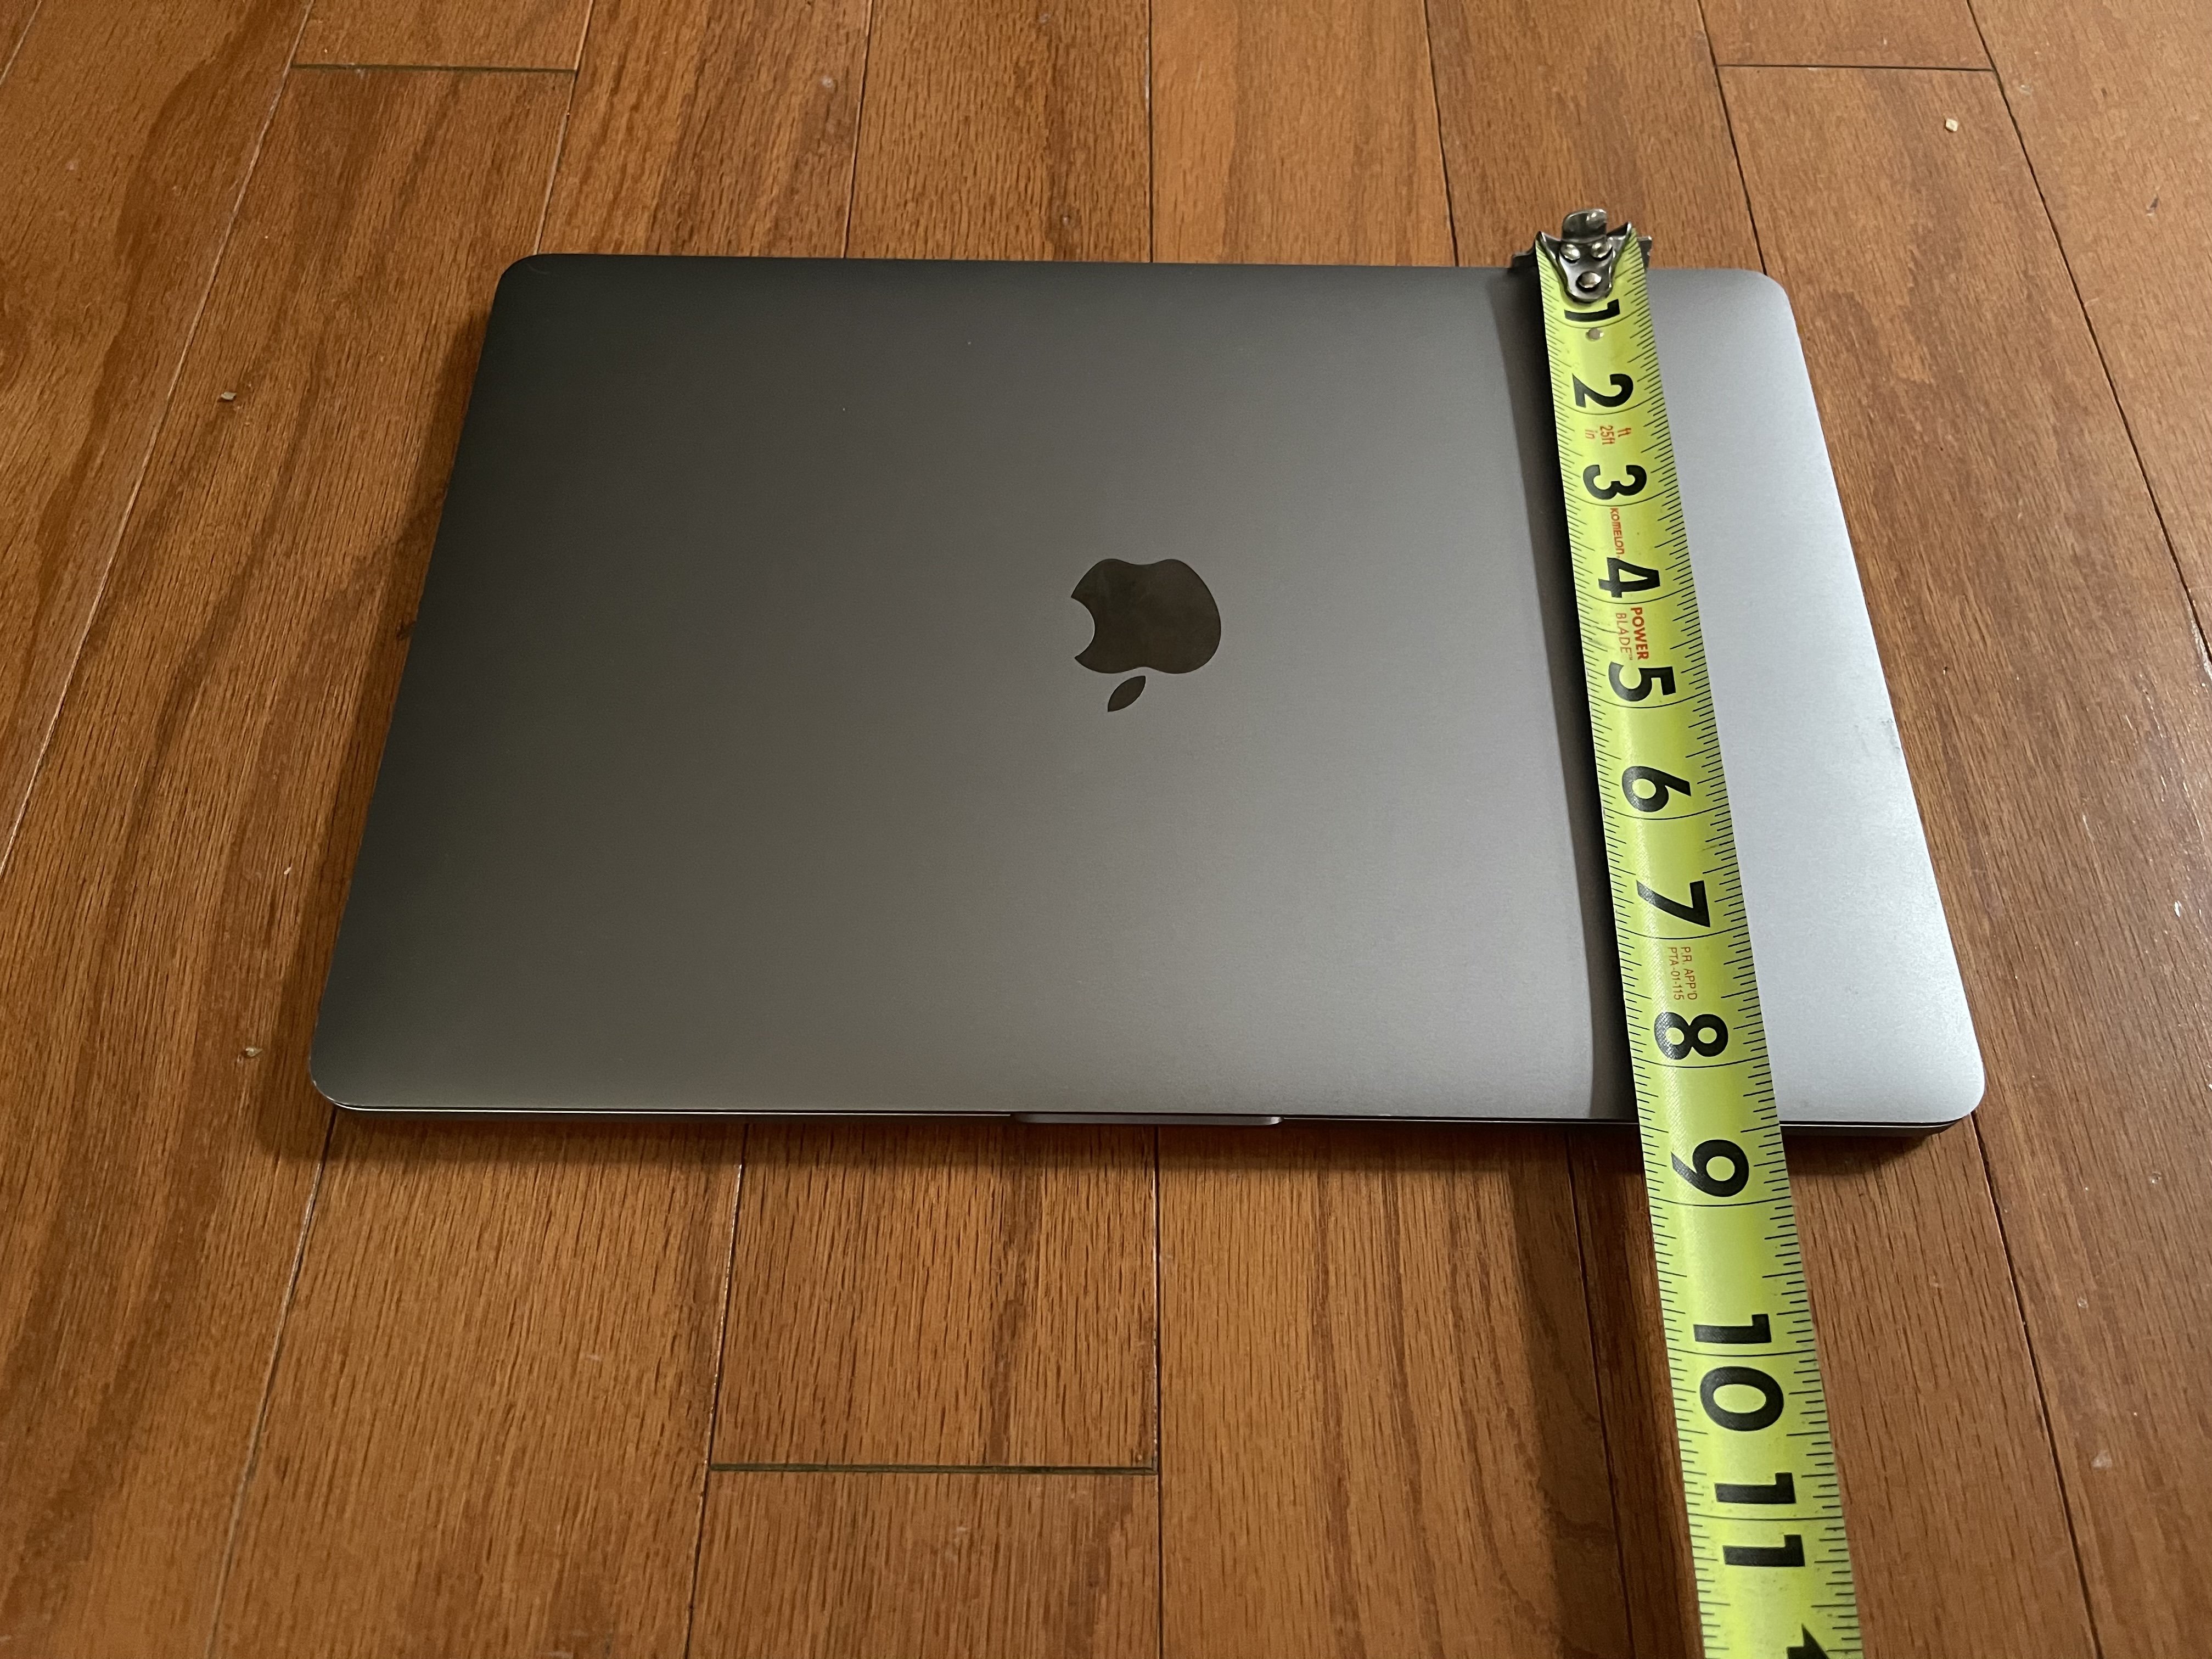
On 4/26/2021 at 8:10 AM, curlyp said:Interesting point about a measuring tape. Thanks for the tip! I just took pics with the measuring tape with it. Is this what you mean? I put the grid marks on my camera and lined them up to the straight edge of the laptop. Did I get it correct?


My apologies, I left out the key information! I use VinylMaster XPT (expert edition). My MacBook Pro is a 2017 non-touch bar. After looking at my laptop, I want to make a template for the mouse pad, left and right of keyboard, top piece of the keyboard, and the top of the laptop (opposite side of screen ). I cannot do the left and right of the keyboard because the speakers are there. Yes, allot of these are $25-$30 on Etsy!
Yes but if you look at the shot. The computer is not "Square" due to the angle of the shot. If you trace than it will not be accurate. You can also attempt to scan the thing if you have a large enough scanner. That will be more accurate in my experience but may not fit your MacBook.
-
30 minutes ago, curlyp said:Thank you both. Yes, I own a MacBook Pro. I wanted to place vinyl to the left and right of the mouse pad and on the top of the laptop (opposite side of the screen).
That makes sense. I will check the site for the dimensions and make some test cuts from there. I am new to this, which is why I reached out. Is it possible to take pictures of the device and vector it in Vinyl Master?
I did this once for a Wii controller. Took a pic and then made a template off that but it was off slightly the first try. Ended up doing it again to get it perfect. If you DO take a pic you will need a way to get it to scale within VinylMaster. In the pick include a part of a measuring tape so you can expand or shrink the pic until the measurements on the pic are correct. Once you size your pic to actual size then you can create a skin. Also bear in mind that if you don't get your pic purely square with the world the image will be skewed.
-
46 minutes ago, salih111 said:After a finish small job, ms SC2 just shot down after several beeping sound that I didn't know where it was coming. Now my cutter doesn't start no light. Unplugged and plugged in but no luck! Any help appreciated! Thanks,
Did you make sure the red button over on the far side did not get hit by the carriage or by some other accidental means?
-
Welcome from Idaho. You're over halfway in my neck of the woods. Great group of support here.
-
If that is the case that you printed, the black looks great so you must be about right on your heat, time and pressure. There is a lot of variation that can happen depending on how you change those three control items. I am surprised that you didn't seem to get any color at all and is why Dakota would suspect the ink. Try a bolder color a darker pink etc.... you will have some trial and error with sublimation. You might grab an old (or new) 100% poly shirt to practice on and save some cases.
Using MH as a plotter, pens & markers that work well
in MH Series Vinyl Cutters
Posted
I'd say a huge success for your experience level. Good job! Those adhesive cutting carrier sheets can be a little wonky when they are out on the ends. If you are going to do this a lot and have the space I would consider some sort of table on one or both sides to help support the carrier while it's working. Think table saw (although not necessarily exactly up at the roller level. Even just setting the cutter on a table may be enough to help with the drooping carrier. I occasionally use a stiff carrier I picked up at Walmart to cut up some craft items for you wife or kids and have seen what can happen when you are out near the start or end of them. Mine are extra stiff, some of those you can find ore more forgiving.
I have also made my own carrier when cutting stencils from card stock by just covering the back with a couple layers of transfer paper (even better with some clear transfer but paper seems to work fine) if you have any laying around.