

Wildgoose
-
Content Count
6,515 -
Joined
-
Last visited
-
Days Won
293
Posts posted by Wildgoose
-
-
You really don't want to cut ALL the way to the edge anyway. If the blade drops off the edge of the vinyl as could happen if it tracks off any at all which it will you could have all kinds of bad things happen. If you need to cut wider you better go for the next step machine that can handle 30" material and then you will have plenty of room.
-
 2
2
-
-
And the pure theater of the moment is the only reason you're not already banned as a spammer.
-
1
-
 1
1
-
-
On your comment about the price. I generally try to get the "perceived" value out of the job. I hate to admit this but when I started I called a few places and asked for phone quotes of basic pricing including installs to get a feel for what my local area is getting for their products. Bearing in mind that I do not have a brick and mortar and therefore way less overhead I can make nice margins and am respectful of the market in the area so as not to end up like the soccer moms on their Cricut machines practically giving away products. If I don't have anything to do and am hungry I may drop down and do a cheap job here and there but as soon as you do one too cheap then they will expect that forever so you need to sell it with some sort of caveat that you had some left over vinyl or they are getting a first time customer discount etc... so you don't set yourself up to be working too cheap.
If I do a log or a design for free I keep the design and own it even if it's their logo. If they want the fruits of my previously free labor (having done it free for a shirt order for instance) they have to pay me to get it. When I do artwork for sale, even if it's strictly a logo build with no product at all, I always make up an agreement with joint copyright so the client owns it from his payment and I own it for my efforts and the ideas that came from my mind. I may use it for advertisement or some elements out of it in some other design etc... I don't do those very often but have done 3 or 4 over the years where someone wanted a logo for their new business or a new logo for their old business. My typical charge is $300 and I explain that it's for approximately 6 hours of computer and consultation time and a thumb drive with their logo(s) when complete. The first one I did not make that clear and they had me doing mock ups for about a week straight so I learned my lesson and now when I get to the point that I am tired of them changing their minds I let them know they reached the limit and will now start paying extra. It helps motivate them to decide. I'm fairly fast with AI but you can still rack up hours very quickly if not careful. This may be bad but I also make sure to leave plenty of time between changes even if small so that they don't actually realize how easy it may or may not have been to adjust. This falls into that "perceived" value thing. One guy had a logo that ended up really simple and it didn't take very long so when it was all said and done I cut the price in half but it was after I was all done and knew what I had into it. He is now a client who buys shirts and hats etc.... That happens a lot. Treat people fair and they come back.
-
1
-
-
SignCut is great for macs. Not free but great. It’s what I use. The original version Pro 1 does no design. Only a cutting interface so I design in AI some people use Inkscape. I think the new version Pro 2 has some design but not sure to what extent.
-
Sounds like your machine has a problem not the program.
Here is a similar issue with a different cutter brand:
-
5 hours ago, Ron Stewart said:Ok. I just redid my question cause I didn't like the way I worded it after I read your reply. You would only charge $50 to design the piece, cut both colors, weed both colors and then install it?
I definitely understand giving a break if you're in the area already and I know first hand about screwing up. Lol. I had to redo two lines of text on my second job which was a window sign.
I actually usually charge about $35 for a basic window about that size plus an up-charge for the second color of about $6/SF but my area prices are really low. That is actually one of th reasons I have switched to mostly apparel, better margins because you not only get the design, vinyl and labor you also get the MU on the shirts. If you have extensive design then you better charge for it. Design is my strong suit so usually something I offer as no charge if they are buying product (and not too many revisions). Some txt in a box is 10 minutes design at best.
-
That doesn't sound out of line. If they baulk at the price or ask about it just tell them you have a $50 minimum charge for any install. If I am there doing other work like several windows or a sign plus the door or window I usually give them a break but you should always allow for the potential screw up you'll have once in a while where you have to do it twice.
-
1
-
-
JBurns has a thermal printer. I have had him print a few stickers for me and they were great.
I actually bought a printer from him and have been working on getting it up and running but haven't been doing much that way. More for my own amusement so far. The Gerber edge printers that he has (and me) are limited in width.
-
I blast a few mugs each year. I just blast them and leave the frosted look. It shows up fine on plain steel/aluminum as well but really looks good on the powder coated ones. You can go with a course grit if the effect is not aggressive enough.
-
2
-
-
3 hours ago, arty-rc said:I finished off my older roll(late 2019) of Easyweed stretch and started a new roll of Easyweed Stretch that I bought a few months ago but it didn't feel quite right. I bought it from an outside site. I found that the backing was frosted, not clear. The backing was just as sticky as the clear and the htv looked and felt the same as always. Has anyone else come across this? Thanks
My newest roll of black came on that frosted carrier so I think its probably the new thing. Did you hear about the higher temp and longer dwell time on stretch they came out with about 6 months ago?
-
Did you try welding the text (even though they don't touch) or making sure they are grouped? Maybe the program is looking at each letter as an individual object? Weird that it just started happening.
-
4 hours ago, James Morse said:. I can see that there is actually one advantage to setting the origin right at the cutter, because otherwise what you do is measure from the edge, then put that in the software (theoretically) but if you just set it with the cutter, you can see where it has to go so you don't care about the numbers. And normally if you are doing something weird like parts of pieces you will be near the cutter anyway so there's no remote advantage there, if it did work from the software. It still makes me wonder why are there features that are in the Vinylmaster but have no significance. There's some disconnect somewhere there. Since you have provided a practical workaround then in practice it is not an issue, but it still begs the question of why have features that don't work? Or else there should be (is?) a list somewhere that says these features do not apply to these plotters (it could be different for different plotters). Lastly - if apparently everyone always sets origin at the plotter anyway, then why would it be in the software in the first place? (plus not work).
James, for comparative knowledge. Higher end cutter like the Graphtec, Summa or Roland will actually measure the vinyl when you load it. It's called "polling the plotter" and if the machine is capable it will just feed that info over to the cutting program and then it knows how much there is there to work with. It comes in handy sometimes but some people shut the feature off. If for instance you had a graphic that was larger than your available width my program (SignCut Pro) will automatically tile it into two cuts. Another good thing is if you keep the cutting area inside the outer pinch rollers then you avoid a situation where your cutter head runs off an edge and potentially damages something.
I think you will find that even with a cutter that doesn't keep track that you still need to have accurate information input into the program or you'll probably have issues. If for instance you try to cut a 22" graphic but only have 15" plugged into the program(even though you have 24" actually in the cutter) the program will think you only have 15" and may give you problems or only complete 15" of it or perhaps tile it into two cuts which you didn't intend. So the numbers still matter. When I had my budget cutter I sometimes just plugged a larger number like 24" in so that I could ignore the effort and I just measured each job manually to be sure it would fit on the vinyl I had loaded. I occasionally ran off the side of scrap pieces and was lucky I didn't break something.
-
Part of taking the leap to being in business is taking the risk in order to receive the rewards. Do the math and take the guess on labor expenses and either add enough to cover a screw up or take the risk and go for it. If you lose money consider it the cost of an education and don’t make the same mistake twice if you can help it. That’s the American dream. Then when you think you’re doing good you’ll be asked to pay taxes. That’s the American nightmare. LOL.
I try to make enough that if I screw up I won’t go backwards and still pay me for my time. If I DON”T screw up then I make good money. If I DO (and it happens) then I don’t whine about it.
-
1
-
-
I usually just use the snipping tool in windows to take a quick screen shot which often is a little smaller file size and maybe a little quicker. I do almost 100% apparel work so I do a LOT of mock ups of tee's and hoodies. As you get good at them you will develop your own workflow. I use mock ups to show clients the look as well as things like getting outdoor graphics the right size. You can take a picture of a vehicle or a glass front window or door with a tape measure laid on there somewhere and scale the pic clear up to life size and thereby build your vinyl to the exact size. Once you bring in the pic make a 12" rectangle and keep scaling the pic until the 12" on the tape coincides with the 12 rectangle in your workspace and you're all set.
-
1
-
-
You need to move your cutter head to where you want it and reset that to zero. 0,0 is always where the cut will start. If you don't change it to the new zero it will always go back over to the old position to start cutting.
-
1
-
-
Guest this is a users forum. No connection to the sales at all.
-
1
-
-
Yeah the T's look pretty good from here. The little tag at the bottom is probably from the blade being at a different angle when it is dropped and then it rotates into position as it starts to travel. Overcut like mentioned will cause the cut to run a smidge longer and connect the end to the start. Don't over-do it.
-
2
-
-
It SHOULD have it there even in the lowest "cut" version I would think. If you can't find it just place the box and put the text on top of it like you want and cut all the colors at once and you will have the exact same thing. Another "thinking inside the box" moment. That's two this week.
-
1
-
-
You definitely want to be very sure that you got that blade set correctly because it will cause all sorts of mayhem if it's out too far. When cutting you should just barely be able to see some light between the blade holder and the vinyl when you bend down at eye level. The holder should almost touch the vinyl when in there cutting but not quite. If there is much more than a teeny tiny bit of clearance then you can have weird issues plague you that affect the cut quality. From your pictures at .25 and .35 it still looks like you need a little more like maybe .40 or something. You usually want to push it past the middle until it starts to show tails like in that picture and then you can determine the very middle and be as spot on as possible. Like looking for the high limit and the low limit and then settle in the middle. If you run a quality blade you may find that you need to tweak that a little bit in 3 months if you wear the tip down. (assuming you do a lot of cutting) Most of us who do it professionally can get 6-8 months out of a quality blade before needing to change them out. Sometimes I change them just to be sure and keep the old still good one for cutting something nasty like glitter HTV.
-
2
-
-
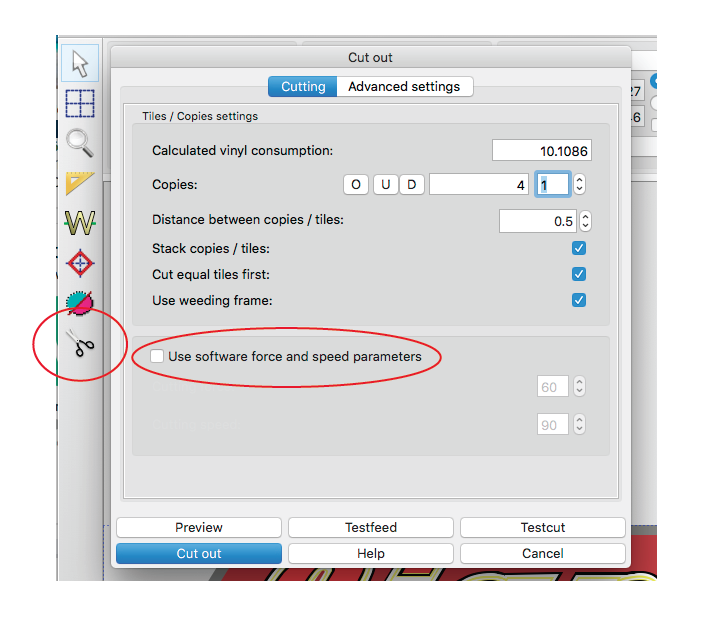
So not knowing much about the pixmax cutter. On the cutter itself can you get to a screen that lets you adjust the blade offset or is it totally up to the software? I use the older version of SignCut but it will have the same options. In the cut tab (in my version it is a pair of scissors...see pic) you will have an option to either use the machine settings for force and speed or the software settings. SignCut drivers determine a lot of what you see on this and other pages so things may look and be different for you but if you can check that part whether you need to decide the blade offset in the software or if you can set it on the machine itself (preferred IMO) Your layout may be different.
The good news is that SignCut has actual real people who will contact you soon and can even remote in to your computer if needed and get you running. I love SignCut. I use it in large part because I am on a mac but it will work on either platform. I design offsite in Adobe Illustrator and then just use SignCut Pro 1 to cut with. The new version you have has design tools I think but I have not tried it out. I own the lifetime dongle so I decided to leave well enough alone and not mess with something that is working for me.
-
2
-
-
What brand is it? Should be a plate or something on the back
-
Like haumana said, the 5 is designed to be like that. Almost every font has some size differences between letters and from my experience if you try to mess with them (like reshape the lower part or resize to be exactly the same as all the others) it will look "off". The guys who design fonts are pretty gifted at getting a balanced "look".
Another work around that you might try is after you get your text ready to cut make your own box around it that allows a little free space and cut that box along with the text or numbers and it will act like a weeding box and keep your text up away from the edge. Just thinking inside the box a little.
") If it doesn't actually cut the bottom part of the box who cares, it was just there to create space anyway your text will be in the clear.
If it doesn't actually cut the bottom part of the box who cares, it was just there to create space anyway your text will be in the clear.
-
1
-
-
-
The process is more than a single step.
1. Set the blade exposure (often called the blade depth but is different than the cutting pressure) There are often instructions that are WRONG that say use half the thickness of a credit card. That is way too much and can cause you to ruin a good blade tip. To set this correctly remove the blade holder from your machine and, by hand, drag it across a piece of scrap vinyl with some force. Not super hard but enough to definitely cut. You should only be cutting through the vinyl and maybe half way into the paper backing. If you can cut all the way through then you have too much sticking out. When you get this set correctly you know that it is impossible to cut clear though. Typical cheap vinyl is 3 mil thick and high end vinyl is 2 mil thick so if you set this on 3 mil vinyl (cheap stuff) you will be good for both as well as most HTV. Occasionally you may find material that is thicker and you'll have to reset it but otherwise for normal day to day work you won't need to make adjustments to this again.
2. Set your speed and down force to relatively slow and light settings. I recommend about 1/4 or 1/3 of the max speed. If your machine can cut at 400 set it at 100 to start with. You can always speed it up later. For pressure you will want to start off light and do small increments until you find the pressure that will cut all the way through. When you get the pressure set just right you should be cutting cleanly through the vinyl and scratching the paper carrier but not be able to feel the cut from the back side. If you cut a little too deep you will find the backing paper sometimes coming up with the vinyl.
3. Set your blade offset whatever the owners manual said was the recommended amount. You will have to tweak this but they will usually tell you what to start at. Typically .25-.35mm is common.
4. If your software has a test cut option use it or you can create a test by making a small 1" square and cut it. If your cuts look like the one you posted you have too much offset.
5. There is a thing called overcut that sometimes needs to be used if the ends of your start and end points don't meet. Most of the time you won't need this. If you do it theoretically would be somewhere around the same value as your offset or less.
-
3
-

Yet another pricing question
in Business Practices, Sales and Pricing, etc.
Posted
Ron, I know this was not the main point of your question but along the same lines if you have ANY input in the designs that you are working on try to steer them to things you can actually build easy. For instance you may design some gnarly American flag skull that looks totally awesome until you actually try to produce it for the client on a sign or tee short. Whoops... I try real hard to show options that can be done with simple 1, 2 or 3 color work. If my clients ask about the more complicated stuff I will go there but I always give them the run-down that if it's got shadows and gradients and all the bells and whistles then it will be printed work and will ALWAYS be printed work costing them much more in the long run. Practically all the truly big names in any industry have a fairly simple logo. Striking and unforgettable for long term brand recognition yes, but usually not complicated. Years later when they have a lot of money they can use that base concept and expand on it if they feel the need for a face lift. An example in my area is a lawn company that has a sweet looking vehicle wrap with grass growing up along the bottom of the car and a picture of an actual lawn mower doing it's thing. It's really a work of art. Try putting that on a tee shirt. So when they DO decide to do a tee shirt what do they do now? Come up with something else entirely? And how does that new look coincide and support the vehicle and the "Brand" they have been busy trying to establish? You won't win all the arguments (and don't argue with your client but you know that) but you can really help yourself out sometimes. Even simple things like showing a flag that the stars are each out in the open and the weed just peels off them vs one that the stars all sit in a rectangle and have to be individually plucked out costing you a lot more labor. I never even show them the solid one so it doesn't get in their head. If they pull out a screen shot off the internet and want something similar I at least TRY to get them to go the simpler way but you can't always get what you want or so the song goes.